fbpx ...

How to Maintain Metal Surfaces in Your Yard

Since the early times, people have praised metal for properties they couldn’t get from natural materials. But actually, metal is much closer to nature than many people think. The iron ore comes from the depths of the earth, so it shouldn’t come as a surprise that metal feels in our gardens like at home. Still, as a man-made material, metal is more susceptible to elements than other materials used in landscaping. Its arch-nemesis is rust – so homeowners need to intervene from time to time to keep metal features like fences, furniture, posts, taps, gates, rails, and grates in a mint condition.

How to Maintain Metal Surfaces in Your Yard

Coating vs. painting

Rainfall and unsteady temperature always conspire to chip away the metal coating. Once the protective layer is damaged, rust is never far behind. One way to avoid it is to choose the most suitable metal for the intended use. Products with baked-on enamel or powder-coated surfaces will last long, without any special maintenance. On the other hand, varnished metal or surfaces protected with regular paint are prone to peeling, flaking, and chipping. Metals with superior coatings are expensive, but their longevity definitely justifies the initial cost.

Debris attracts moisture

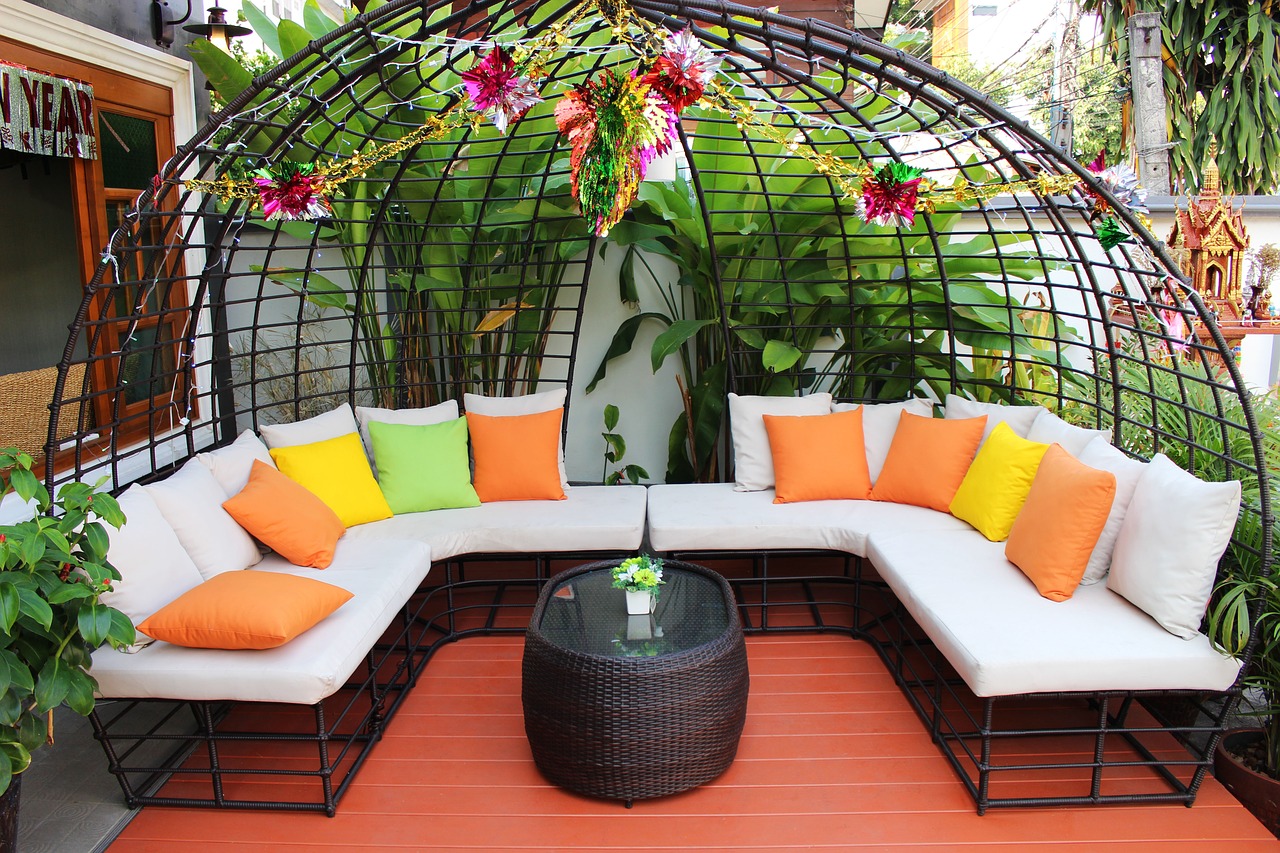
With its intricate details, metal patio furniture is particularly exposed to a risk of decay. However, a few simple routines can make it last many years. The first defence against rust is cleanliness. At least twice a year, let’s say in spring and autumn, give your patio set a good scrub. Stir some liquid detergent in a bucket of warm water and use a sponge to remove dust and debris that attract moisture. Use an old toothbrush to reach hidden areas. When you are done, rinse away the detergent with a garden hose and leave the pieces to air-dry in the sun.

Physical protection

As mentioned above, it is the coating that safeguards metal from rusting. Careless handling can make two metal surfaces clink and cause chipping on one or both pieces. Whenever you need to move metal furniture, lift the pieces from the ground instead of dragging them. When the time comes to pack your outdoor furniture inside, make sure you protect the pieces with old towels or bed sheets to prevent them from scraping against each other.

How to Maintain Metal Surfaces in Your Yard

Quick and effective solution

Still, even if you take all precautions, no one can guarantee that rust won’t develop over time. Although seemingly a small problem at first, it can get more serious if left unattended. Once you spot a small patch of rust, clean the area as described above and stop the corrosion in its tracks by using a quality rust converter. These products interact with iron oxide, converting it into an adherent black layer that is moisture-resistant and provides an excellent surface for latex and enamel paints.

Highly damaged surfaces

In cases of more extensive damage and negligence, you may need to refinish the metal – a task that demands more time and effort. Before you can start refinishing, you need to get to the bare metal surface. Using a wire brush or a special wire wheel drill attachment, scrape away the old coating. Take care not to damage crevices and folds that may be a part of the design. After you have removed the coating, wipe down the dust with a damp cloth and let everything dry before you apply the primer and metal paint.

The majority of homeowners regularly tend to their lawns and shrubs, trimming and clipping to add appeal to their gardens, but only a few pay the same attention to metal elements in their yards. With rust, prevention is the best protection, but when the surface layer is already damaged, quality anti-corrosion products can save the day.


Tips for a More Organized Bathroom

Tips for a More Organized Bathroom

Your bathroom is the place where you and your family clean and groom. It’s also usually the first room you head to in the morning and the last room you hit before bed.  It contains a lot of products: everything from your laundry to your make up, your hair products, shower products, and sometimes even your cleaning supplies.  Some of us store interesting reading material, and those that like a touch of luxury will make their bathroom the backdrop for gorgeous towels and candles, along with wonderful bath salts or bubbles. Unless you have a huge bathroom with tons of storage, this can become a bit overwhelming, and it pays to stay organized so your bathroom doesn’t become a haven for clutter.

One way in which to get great storage out of your bathroom is to keep like products together.  This helps to eliminate a frustrating treasure hunt every time you want something specific, and it might help eliminate excess shopping since you can easily identify exactly what you’ve got already.  Your vanity cabinets are a great way to hide products from view, and generally contain enough space for tubs or containers to keep things neat and tidy.  If you’ve got open shelving, it’s nice to get a set of matching or complimenting boxes or baskets to keep things tucked out of sight.  As a bonus you can often get containers like this in a variety of styles, patterns and colours to match your existing bathroom decor.  In fact the organizers can become a cute feature in your bathroom, drawing the admiration of guests.  If you’ve got cupboard doors on your vanity, you can try adding standing shelves to tuck even more supplies away, or use the same baskets or bins as you would with open shelves.  You can also try to increase more space by adding baskets or hangers to the backs of your vanity doors.  Hair dryers and flat irons can handily tuck into these, ready when you need them.

bathroom

If you’ve got available wall space, it’s a great idea to add some shelves.  Once again, the shelves can hold decorative organization bins and create a great look in the room.  Some baskets even come with tiny chalkboard panels so that you can list exactly what each of them holds.  One could be for makeup, while another holds shaving essentials or your favourite supply of soaps or lotions.  Shelves can also hold your baths reading material, or dishes of bath salts or candles if you’re a fan of adding romantic flair to the space.

Your drawers offer an opportunity for being wonderfully organized, or they can hold a mess of products that you have to scramble through on a daily basis.  There are some super options out there for keeping everything in order!  Drawer dividers are extremely flexible and come in all shapes and sizes so that you get a customized look for your space.  Divide each of your drawers so that your dental hygiene products, feminine products, grooming tools, makeup and hairbrushes all have their own individual areas.  Everything will be tidy, organized and easily accessible when you need it, cutting down on grooming time in the morning and maybe even allowing you a few more minutes in bed.

If you’re a parent you know how kid’s stuff can quickly clutter a bathroom.  There are so many fun bath toys and products for our kids from the time they arrive right through to the teenage years.  A very simple and cost efficient way to handle their mess of supplies is with a hanging net.  These can be very handy especially with regards to tub toys – which seem to multiply over night!  You can also get tub toy holders in cute animal faces that hold a lot of things at once and attach to your tub or shower wall with suction cups.  You can even tuck the kids shower gel or soap into the same bin to keep all of their supplies together.

bathroom

One really cute idea is to make your mason jars do double duty.  If you’re an enthusiastic canner, you probably have a bunch of these things sitting around collecting dust, and with a little time you can turn them into unique and beautiful holders for your Q-tips, tweezers, make up brushes, and a variety of other little easily lost bathroom products.  Simply take a nice piece of wood, and either paint or stain to match your decor or rough it up to add a rustic touch.  Use clamps to attach the jar neck to the wood, and mount into the studs in your wall, ideally over your bathroom sink for easy access.

If you’ve got the floor space, a cute cabinet or a cart is ideal for holding bathroom products, cleaning products, or even rolled up towels and face cloths.  The nice part about the cart is that you can quickly roll it around depending on where you most need it at the time.  It can be tucked into one corner with toilet paper rolls, or moved over to the tub where it can serve to hold all of the bath products you need for a luxurious soak.  This is great for renters too, where putting up shelves or making other alterations to the bathroom isn’t an option.

Home improvement doesn’t need to be extravagant. Starting with simple things such as this can ease your mind in the long run and help you remain motivated for bigger projects in the future.

This article was written by Martin from Poshh. He has over 10 years’ experience in writing health related topics and specializes in the health benefits of saunas and hydrotherapy.


The Ultimate Houseplant Cheat Sheet

The quality of the air we breathe every day is so important to our overall health. This infographic from Capital Garden Services takes you through the health implications of indoor air pollution and takes you through the best plants for each room. Research has shown that indoor air pollution can increase our risk of stroke by 34% so it really is worth taking the time to read through the infographic and finding the perfect plants for your home.

Sometimes, people buy plants and are a bit unsure of how to take care of them. They might put them in the wrong room or water them too much or too little. For example, many plants, such as the Chinese evergreen and the English ivy, require much less water in winter so it’s important to keep things like this in mind.

Also, some plants need less sun than others. For example, the Snake Plant is a great addition to the bedroom and it needs minimal direct sunlight. Find out more in the infographic.

The-Ultimate-Houseplant-Cheat-Sheet-Infographic

Simple Tips for Organizing Your Entire House

Decluttering your home doesn’t have to be a nightmare. You may feel anxious and discouraged when you see all those stuff scattered everywhere, but with some planning, you can get on top of that and restore your house. Try to picture your home clutter-free, where every single item has its place. This is not hard to achieve and the tips below will surely get you going. So stop procrastinating and start reorganizing your living space.

There’s no success without a plan

Before you start decluttering, you should sit down and make a comprehensive to-do list. Try to think of every single activity that has to be done daily in order to avoid making your home messy again. Make sure to hold onto that list, since it will come in handy for the next cleaning occasion.

Think of priorities
Simple Tips for Organizing Your Entire House

The best place to start reorganizing is where the most clutter is. That’s probably your living room. Go ahead and throw out piled mail, magazines, and papers laying around the room. After you’re done with the living room, you should continue with kitchen and bathroom. With those three rooms done, you’ll already feel some relief.

Prevent yourself from shopping excessively

One of the main reasons you found yourself in a cluttered house is because you have too much stuff. Make sure to think twice before you bring another item in your crowded home. You should look around and see which items you use on regular basis. Everything else is just collecting dust and should be removed.

Routines are good sometimes

Decluttering your home just once won’t be sufficient in the long run. If you’re not doing it constantly, you’ll have a new mess in no time. Make sure to develop a few healthy habits and stick to them in the future. Try to do simple stuff on daily basis. Hang your jacket the moment you enter the house, wash the dishes right after finishing the meal etc.

Share responsibilities

In case you’re sharing your home with other people, try to include them when the time for cleaning comes. Instruct them about their responsibilities on daily basis, and watch how your home is getting cleaner and decluttered in no time.

Get rid of unused stuff
organizing your house

Make sure to permanently dispose of all items that you’re not using anymore. There are few ways you can do this. In the first place, you may drop that stuff to a charity organization, and bring happiness to those in need. Another way is by organizing a yard sale. That will be a fun event, and you’ll make some extra cash instantly.

Avoid disturbance

You want to make sure you’re not disturbed while cleaning. If someone calls while cleaning, you can lose a lot of time before continuing. You should turn off your phone and other devices which can steal your attention. Put up your sleeves and concentrate on the work.

Everything should have its place

Try to avoid piling your mail and other stuff on every free surface in your house. Instead, you may try to make a system which you’ll follow in the future. Think of a specific place for every item and stick to that. A good way of achieving that is to use high shelves and closets. In case you lack space, you should consider renting an affordable self storage unit in your area.

Cut it with the excuses

The best way to get in the way of making excuses is to pick up the big black bag and start tossing stuff in it. After just ten minutes of doing that, you’ll see some changes, and that should keep you motivated to go through the rest of the house.

You can’t do it alone

Don’t hesitate to call friends or family members to help you with reorganizing your home. With all these people, you’ll be able to get the job done very fast. You can use the spare time to make a tasty dinner for your helpers. At the end of the day, you’ll have a clean house and a fun evening with your loved ones.

Final thoughts

The tips mentioned above should do the trick, and you’ll get your home decluttered for good. Just stick to your plan and newly acquired habits, and you won’t find yourself in the bad spot again. Don’t forget to give a favor back to everybody who helped you with reorganizing your home. Now you can relax and enjoy your spacious and clutter-free home once again.

Chloe Smith is a cycling enthusiast, business consultant and a part-time writer always willing to share tidbits of advice. She believes that passion, courage and, above all, knowledge breed success.

Common Interior Design Mistakes To Avoid

Common Interior Design Mistakes To Avoid

Let’s face it: Designing the interior of our homes can be challenging. And scary too, because we could commit mistakes and interior design mistakes tend to be on the costly side of things. Still, somebody has to do it. We all just need a little confidence. Hopefully, the following tips about common interior design mistakes to avoid would leave you a bit more confident about designing your place.

Not having a plan and a budget

Impulse buying is exciting, but that piece of furniture or mirror may not work with your overall interior design the way you thought it would. You could also be spending more than what is sensible, and you could end up with an interior design project that’s more expensive than the house itself. To avoid buyer’s remorse and an interior design fail, you should have a plan and a well-established budget before buying anything.

Buying furniture without measuring anything

Sometimes, homeowners get so excited about a large and lovely couch they saw in the store that they never give any thought about whether or not it will fit through the door in the first place. Oversized furniture is fine. Just make sure your place has enough space to accommodate it. Large furniture in small areas will make the room even smaller, and that’s one big interior design mistake.

Choosing paint before fabrics and textiles

Finding fabrics and textiles before deciding on a paint scheme is so much easier than doing it the other way around. If you do paint first, good luck finding rugs, curtains, pillows, and upholstery that you love that will perfectly match the color of your walls.

Common Interior Design Mistakes To Avoid

Inadequate lighting

It’s true that lighting often takes a backseat to other interior design elements, and that is a mistake. Any home should have adequate lighting, and a set of overhead lights are simply not enough. Lighting should always be layered within any given space. With multiple light sources, you’ll be able to add depth and dimension to your home.

You should also let plenty of natural light into your home. Place curtains and accessories smartly, and install mirrors directly across your natural light source so all that beneficial sunlight can bounce around the room.

Not letting go of heirlooms

So your grandmother left you this grandfather clock. It’s been in your living room for years and still works fine. You are, however, about to embark on a redecorating project and your family heirloom doesn’t have a place in it. But because of its sentimental value, you keep it, and it ends up sticking out like a sore thumb. It’s hard to get rid of heirlooms, but if they don’t fit the style of your home, you should have enough resolve to let them go.

Not asking for interior design advice

Sometimes, we get too close to our work that we fail to notice our mistakes. This applies to our attempts at interior design, especially when we have already spent so much time on the project. If we can ask somebody to take a look at our work and spot any mistakes, then we should go ahead and ask for that person’s opinion. A friend can tell you honestly if there’s something off with your choice of fabrics or colors.

The best source of opinion about interior design, of course, is a real interior designer. If you can’t hire one full-time, you can consult one who charges by the hour. With the many design tricks up their sleeve, interior designers can effectively transform your home the way you want it.

Bio: Karen Ashworth is a freelance writer and blogger who enjoys staying on top of trends in architecture and interior design.


6 Tips on How to Make Your Garden Stand Out

Everyone enjoys having their own piece of heaven, a place where they can relax, think, create… For most, nature is the inspiring one and this is why we all strive to have a garden, regardless of the size of the plot given, it could be a balcony, a rooftop or a proper backyard. The goal is to create an eye-catcher for the people passing by and a favorite place for your friends to hang out.

Start with a clean-up

Just the same as you do with your house, make your garden look as if everything is there because you intended it to be. Begin by removing all furniture, old clutter, trimming the bushes and the trees and of course mowing the lawn if you have one and clean paving stones.  If you enjoy having what in the words of Jane Austin is described as ‘a prettyish kind of a little wilderness’ you can keep your garden, or parts of it looking untouched. Please be careful with these, you still want it to look safe and inviting without having to worry if you will step on something or if something will fall from a tree.

Choose the flowers

Choose the flowers

The main role in your garden is played by the color-pattern. You can have a theme and combine purple and yellow, orange and red, blue, white and purple etc. or have all colors intertwining. You can have this done by planting flowers. You can plant them in the pots or in the ground directly. It is a good idea to choose perennials as when the season comes, they surprise you with a blossom. If you are not too keen on growing flowers, you can simply buy plants in bloom in little containers every season and put them in your colorful pots. Now all you need to do is to remember to water them.

Furniture

The style of your furniture may vary. Give your old furniture a new glow by painting them or looking up some of the new makeover ideas. You can even use this trick and make your furniture fluorescent. Make sure the size of your furniture fits the size of your garden. Also, in the untamed, wild-looking parts of your garden, you may want to have furniture that reassembles old park benches.

Garden art

Use garden art

You can buy these items in a store, or even better you can use your old clutter and transform it into beautiful garden pieces. Used car tires can be beautiful flower pots, an old wagon wheel, a bicycle or a lantern can make it seem like there is a story behind your garden. Even practical things like colorful hose reels can add to the beauty of your sanctuary. By adding pebbles, you can make your flower beds a little more interesting and make it a little harder for weed to grow.

Light it up

As a final touch, you may want to add some lights for when the night falls. There’s nothing prettier than pretty Christmas lights. Use them on your gazebo, a rose bush or simply hang them from the branches of the trees around your garden and you will spark a fairy tale. Find suitable lanterns or torches. You can even make your own lanterns if you feel creative.

Don’t clutter up

There is no such thing as good clutter. Don’t make your garden look too busy as it won’t allow you to relax. Organize your flowers into clusters. Don’t get every piece of furniture you may want to have as it might not fit the space. Same goes for garden art. If you discover you enjoy making garden art, don’t keep it all give some away, it will make a unique present. If you lack space for all the plants you would like to have in your garden, you can use suspended flowerpots, that way you will make room on the floor, and gain a sense of greater space.

A beautiful garden can help you endure the lack of time you have in your every-day life. It doesn’t matter if you don’t get to take your child to a park if your own backyard can give a sense of an outdoor heaven.

A Simple Guide to Successfully Inspecting Your Own Home

A Simple Guide to Successfully Inspecting Your Own Home

Being proactive is a good policy in general. It’s especially important in home maintenance. Performing regular maintenance and catching minor repairs before they become major can keep your home and its systems in optimum condition.

How often should inspections be done? Most home repair experts suggest every six months. A Spring inspection can catch any damage done by cold and winter storms. An early Fall inspection can make sure that heat or open doors and windows haven’t done any damage. In addition, of course, frequent inspection causes any normal wear and tear that needs to be addressed.

Here’s a simple guide to home inspection.

      1.  Heating and Cooling Systems

Your heating, ventilation and cooling (HVAC) systems can be checked by careful examination of components.

First, look at the air filters. They should be cleaned or replaced regularly. If they are dusty and dirty, they definitely need to be replaced. Your system will not run at peak performance if the filters are dirty.

Second, look at your air ducts. Do you see any duct tape? Is it in good condition, or peeling and drooping? Replace it if so. Any dirt or dents can indicate problems. Look for any torn or collapsing sections if you have flexible ducts.

Third, turn on your furnace and eyeball the flames. It should be a steady blue. If you see yellow or orange flames that flicker, there may be issues with its combustion. Call a professional to resolve.

Fourth, thermostats need to be cleaned. Take the outer covering off and clean any dirt and dust with cloths or Q-tips.

If your air conditioner compressors are outside, check to see that shrubs or vines (or trees!) haven’t grown over them. If they have, they need to be cut off or they can severely impair the life and function of the unit. Make sure shrubs, vines and trees are pruned. If this looks as if it will be a chronic problem, it’s a good idea to move the landscaping to a different place.

     2.  The Water System

Check every water faucet for signs of leaks and signs of rust. Leakage can cost you in lost water, but they also lead to bigger leaks. Have them fixed at the first sign of leakage.

If you have rust or signs of rust from leaking water, such as reddish stains, have a professional inspect the pipes.

Basement converted to a gym, White Plains, NY

     3.  Attics and Basements

Attics and basements can both be subject to water damage, either from minor flooding or saturated ground in basements or roof leakage in attics. Most of this inspection can be done by carefully eyeballing your attic and basement. Do you see any sign of water damage to stored boxes, for example? Check any wood for signs of rot or water by poking with a screwdriver. Look for signs of mildew. If you see any signs that water leakage is a problem, call a professional who can find and fix the source.

Check your basement and attic for signs of pests as well. Mice, termites, ants and other pests can enter your home by crawling in from the ground through areas in the basement, or from the roof to the attic. Termites leave termite tubes, ants leave trails and mice will chew almost anything. If your insulation or stored camping food has been chewed, you may have mice.

    4.  Roofs

Roofs can lose shingles due to age or winter weather. Other materials can degrade due to the same factors. You also want to make sure that, whatever the composition of your roof, you don’t have birds or other animals nesting on it. They can cause damage that will cost you plenty to repair if the creatures aren’t proactively removed.

Inspect your roof carefully for signs of wear and tear. Roofs in the natural course of events will need to be replaced every 20 to 30 years, so be sure to keep them well maintained to ensure maximum long life.

     5.  Foundations

Look at the foundation for signs of cracks. Hairline cracks are normal, but if they become larger, it’s wise to keep an eye on them. Keep a notebook and note the size of any cracks. If they become noticeably larger at the next inspection period, call a professional for a thorough inspection.

decks and patios

     6.  Decks and Patios

Examine your deck or patio for any sign of wear and tear. Harsh weather may cause damage to either. Both decks and patios, of course, will require maintenance as time goes on. Do you need to remove any vegetation growing around or through cracks in the patio? Does your patio or deck need power washing or a sealant to look its best? Both should be part of regular maintenance. If they have not been, it may be time to institute them every six months.

     7.  Paint

The exterior of a home will need to be painted roughly every ten years. While not strictly speaking a repair, faded or peeling paint can expose your home’s materials to the elements more than if the paint were in good repair. Look at your home’s exterior with a stranger’s eye. Does it look fresh and appealing? If not, it’s time for a new paint job.

Maintaining your home well ensures that minor repairs remain minor, both in cost and in effort needed to fix them. Routine home inspections will ensure that you find any repairs that need to be made.

Author Bio:

Kacey MyaKacey is a lifestyle blogger for The Drifter Collective, an eclectic lifestyle blog that expresses various forms of style through the influence of culture and the world around us. Kacey graduated with a degree in Communications while working for a lifestyle magazine. She has been able to fully embrace herself with the knowledge of nature, the power of exploring other locations and cultures, all while portraying her love for the world around her through her visually pleasing, culturally embracing and inspiring posts.

https://twitter.com/kacey_mya

https://www.pinterest.com/kaceymya/

https://www.instagram.com/thedriftercollective/

3 Simple Steps To Motivate You To Organize Your Home

3 Simple Steps To Motivate You To Organize Your Home

Everyone wants to get organized but very few of us quite get around to it. The main reason why many people get lost in clutter within their homes is the sheer lack of motivation. An individual might spend an hour each morning looking for stuff, but they never think about organizing the space to solve that problem. If you have never been one the few who have everything in its place, here are 3 tips to motivate you to organize your home:

  1. End Results

The biggest motivation for me is thinking about the end result. A clean, fresh and attractive space is the best gift you could possibly have. In an organized home, bugs have no place and you will not be losing money on something that was lost in your clutter. An organized space gives a good impression to guests and friends.

  1. Get Inspired by the Media

To get motivated into organizing your home, try leafing through organized living magazines, newsletters, and books. You can find organization advice on just about anything from making better use of dead space in your kitchen to a closet organization system for your bedroom or pantry. This will not only give you organizing ideas but having a look at these homes will certainly trigger the desire for some order in your home. If the books and photographs do not bring any inspiration, you could watch a few programs on organizing for more realistic tips. From all the reading and watching, you will learn important organizing hacks to help make the difference. If you have much clutter to deal with, dedicate an entire weekend or week to organizing. Remove everything from a room, and have a number of categories to either keep, donate or dump. With everything in the right pile, you can clean the empty room, shelves, and cabinets accordingly. Once the room is dry, start putting everything that you decided to keep in a specific place. The lessons learned during research about organizing are motivational enough to keep things neat and tidy.

  1. Baby Steps

Start by drafting a to-do list and ensure you make organizing a daily routine. This will motivate you to do a little more cleaning, arranging or dusting every day. This action will encourage you to consistently organize your home which will come naturally no matter the day or time. There should be some must-do tasks to accomplish each day to prevent clutter from creeping back in. On days when you feel like breaking the habit, give yourself a reason to organize like inviting some friends to dinner. Since you would want to host guests in a neat and clean space, you will be inspired to clean up and organize. Make your organizing fun by playing some music, wearing comfy clothes, or rewarding yourself for tasks accomplished.

Living in an organized space is not only good for your image, but it is also a healthier and more productive choice. You will not waste time looking for things in the morning, nor will pathogens find a hideout in your home. It might take time to organize the entire house but once you get started, the rewards become simply irresistible.

Expert Guide to Packing for a Home Move


Expert Guide to Packing for a Home Move

It is common for people to start packing for a move at least eight weeks before the big day. Still, last-minute moves are not so unusual. There are situations when people need to move in less than four weeks. If you ever find yourself in such a situation, here is a simple guide on how to pack and sort your items on short notice.

Keep only what you need

The best thing about last minute moves is that you can get rid of the ton of stuff you don’t need. Once you start packing, you will quickly realize that it is easier to throw away than to take with you. At the end of the day, you will also save time and energy. It’s a common mistake to believe that you should pack everything and sort later. Not true. Make sure to get rid of as many things as you can.

Walk through the house and make three piles in each room – 1) keep, 2) donate and 3) dump. Involve the whole family in sorting out their stuff, and bear in mind – if you are unsure what to do – dump it.

Donate what you don’t

Charities are always ready to take away your unwanted stuff. Even if your donation pile is large or you have bulky furniture items that are still in good shape, a non-profit organization can organize the transport, saving you both the time and money needed to get rid of them.

Just make sure that you have sorted everything out, so they only have to make one trip. Phone the organization and determine a pick-up date and time. Before you make a call, bear in mind that some charities only pick up on specific dates and specific locations.

Prepare packing supplies

Used cardboard boxes are the most convenient way to transport your items to a new home. Still, if the time is the issue you should purchase your boxes and other packing supplies directly from a moving store or office supply company.

On the other hand, if you are moving locally, ask for green movers who provide multi-use plastic bins. Not only will it save the environment, but also the time needed for finding boxes and getting rid of them once you unpack. Reputable moving companies also offer transport containers for bulkier items like furniture and outdoor equipment.

Ask for help

When it comes to moving, you have three recruitment pools – 1) friends, 2) family and 3) service companies. Friends and family are always eager to help. However, make sure that before you “hire” them, you know exactly what every person’s job will be. There’s nothing worse than a helpful hand wandering around and getting in the way of everybody else.

Professional movers are always a phone call away, and some of them offer a truly comprehensive range of services. For instance, aside from treating your belongings with the utmost of care during the move, the guys who own and operate City Removalist will even do the packing and unpacking for you in case you are, say, short on time.

Once you have the supplies and able-bodied helpers at your disposal, you can start loading the “keep” pile into boxes. Large appliance and some pieces of furniture will require special preparation before they are loaded. Moving professionals will help you with every aspect of the move, either by providing packing containers or pack everything for you. One way or another, they’re a valuable time-saving service.

4 Quick Plumbing Fixes Anyone Can Master

4 Quick Plumbing Fixes Anyone Can Master

Even though plumbing systems can be relatively complex, there are a few fixes and repairs that everyone should master. Major issues such as cracks in the sewage line will need to be taken care of by a professional, but minor leaks and clogs can easily be fixed with basic tools and a little bit of research. Whether you are renting your first apartment or have just purchased a brand new home, here is a look at some simple repairs you should know how to do.

Dealing with Clogs

If only one of your sinks or showers is clogged, then the debris is most likely not that far down the sewage line. That means you should be able to take care of it with an over-the-counter clog remover. Those who don’t want to use harsh chemicals can also make their own clog remover out of baking soda and vinegar. Homeowners should immediately call a plumber like Knights Plumbing & Drain if multiple sinks, toilets, or showers become clogged at the same time. Deeper clogs can only be broken apart with specialized tools.

Fixing a Leaky Faucet

A single leaky faucet in your home could end up wasting hundreds of gallons of water a month if you don’t take care of it right away. Fixing a leak might seem intimidating, but this job is relatively straightforward as long as you are careful and meticulous. Most leaks can easily be fixed by tightening a handle or replacing an O-ring. Before fixing a leak, you must first shut off the faucet and plug the drain to prevent water damage.

Relighting the Water Heater

One of the most common problems that homeowners run into is the water heater’s pilot light going out. The vast majority of water heaters have a visible valve with a “pilot” position. After turning the valve to that position, you then need to use a lighter with a long neck to relight the flame. Homeowners should never attempt to relight a water heater if they smell gas.

Replacing a Shower Head

Upgrading or replacing an old shower head requires nothing more than an adjustable wrench and some plumber’s tape. The old shower head can be removed by loosening the single connecting nut until the entire shower head comes off. You must then wrap the exposed threads with plumber’s tape to prevent leaks. The final step is to attach the new shower head by turning it clockwise on the threads before tightening the connecting nut.

In order to carry out most plumbing repairs, you are going to need a decent set of tools. At the very least, every homeowner should have a combination wrench set, a plunger, pliers, an adjustable wrench, duct tape, and a caulking gun. These few tools will allow you to take care of minor clogs, slow leaks, and other basic repairs.

Copyright © 2024 | Bruzzese Home Improvements | All Right Reserved | Web Design & Development by QualityMust