When we talk about burning calories at home, we are not talking about burning calories on the treadmill. We are talking about burning calories doing home maintenance around the house. You can burn an immense amount of calories every single week, from the spring to the summer, just by making your home look better.
Don’t believe us? Take a look!
Week 1: Mow the lawn for an hour (400 calories), sand the floors for an hour (238 calories), paint a room in the home for four hours (1,088 calories), wash the fence for two hours (476 calories). Total calories burned this week: 2,206.
Week 2: Mow the lawn for one hour (400 calories), repairing the dishwasher for two hours (476 calories), paint another room in the house for four hours (1,088 calories), remove carpet in previously painted room for three hours (714 calories). Total calories burned this week: 2,678.
Week 3: Mow the lawn for an hour (400 calories), spread some dirt in garden for an hour (272 calories), clean the gutters for three hours (714 calories). Total calories burned this week: 1,386 calories.
Week 4: Mow the lawn for an hour (400 calories), lay tile down in kitchen for five hours (1,190 calories), paint the fence for four hours (952 calories). Total calories burned this week: 2,542.
This is over the course of one month and in that month, during household tasks, you would have burned 8,812 calories.
That is more than you will find in 11 Big Macs, or 47 slices of pizza!
That is a lot of weight to drop helping make your home look great by doing yard work and home maintenance. All it takes is you wanting to improve your home and to get down to work making it look great, and making yourself look great at the same time.
Cooler temperatures are on the horizon and now is the ideal time to begin checking items off your seasonal to-do list. Complete simple projects before the harsh winter weather arrives so your home is ready to enjoy in the coming season.
Add some pizzazz with paint
Fall is the perfect painting season, especially if you’re looking for a simple weekend project that provides instant results. Mild temperatures allow you to open windows and circulate fresh air while applying new color to your walls.
Select bright shades for interior spaces to fend off the potential winter blues in the months ahead. Dutch Boy Paint recently partnered with three top bloggers to make over their spaces with fresh, fun colors. Elsie Larson from A Beautiful Mess, a blog focused on creating happiness through a homemade lifestyle, shared how to quickly and easily personalize a bedroom by painting an accent wall with a bright turquoise hue that’s sure to help lift your spirits.
Space warming tricks
Now that you’ve warmed up your space with color, you can focus on preparing the rest of your home for the winter months. Flip your ceiling fan blades so they run counterclockwise – which will push warmer air down to instantly heat up the room. A fast fix to keep cold air out and warmer air in is to install weather stripping on your doors and windows. Regulate the temperature of your home by adding area rugs for extra layers of insulation, especially if you have wood floors.
Make sure you’re not left out in the cold by scheduling a furnace checkup to ensure everything’s running properly. You’ll thank yourself later for not waiting until it breaks during a snowstorm to have it fixed. If your home has a fireplace and chimney, hire a professional chimney sweep to remove any debris that could potentially ignite and wreak havoc on your home during the months ahead.
Outside guide
Even though much of your time will be spent indoors during cold months, it’s important to remember your outdoor obligations. Winterize any pipes that are exposed to outdoor temperatures and turn off the water to exterior faucets. Be sure to disconnect all hoses and spigots and drain all remaining water from the pipes, as leftover water can freeze and cause the pipes to burst. Cover grills and air conditioning units, and store outdoor furniture, umbrellas and cushions in a shed, garage or covered area to prevent rust and damage from the elements.
Thoroughly clean gutters, give your lawn a final mowing and fertilize and prune your flowers just before the temperatures begin to drop. This will minimize the work that needs to be done when the ground thaws in spring.
By taking the proper precautions and completing these seasonal projects now, you’ll save time and money, all while keeping your home well-maintained and looking great heading into the months ahead.
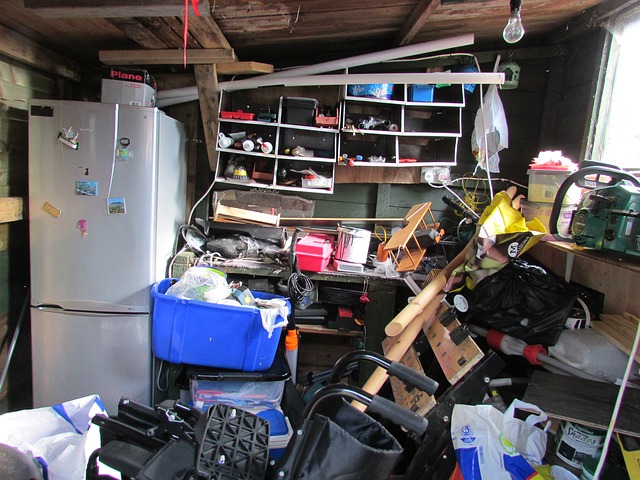
The American Dream used to be a car in every garage. Nowadays, most homeowners just dream about being able to fit their car in the garage. No matter the size of garage, the amount of junk, tools and extras always outweighs the available space. But with a weekend of elbow grease and a little planning – and yes, some elimination – even the most cluttered garage can once again be a safe haven for the family truckster.
You’re gonna get dirty
Even the most fastidious homeowner can neglect the garage. It’s just a catchall and doesn’t rank up there with the foyer or the modern kitchen. Blowing debris, mud tracked in from the kids, and dog hair from the family pet all add up to one heck of a messy place when it comes time to clean.
Pick a nice sunny weekend and empty the garage. Don’t just pull the lawnmower out. Gut it. Pull the lawn chairs down off the wall. Take the recycling bins to the back yard. This is the time to employ the “10 second rule.” As you grab an item, give yourself 10 seconds to have a valid reason for keeping it. If there’s no good reason then it goes in the trash pile or the sell pile. If it’s not there for a reason, it doesn’t stay. More than likely you’ll be saying goodbye to the newspapers you have kept for the last few years as kindling for the backyard burn pit you never built. And the toddler swing and kiddie bike should go on the sell pile considering your youngest just went on his first date.
Make it empty and survey your space.
Once the garage is empty, swept and de-webbed on the walls, you can make a map of where your treasures will actually live. Now is the time to consider putting in a work bench and corner off a work space. Check the walls for the most logical place to hang yard implements and bins for athletic and outdoor equipment. If you have a furnace and water heater in the garage, make a safe zone around the appliances. Do this especially if your home is newer so you do not void the home warranty.
Use a tape measure and notebook paper and lay out a schematic of the garage floor plan. When placing the car in the picture, make sure to leave room for properly opening the doors without scraping the wall, lawnmower or second car. Make the bicycle corral easily accessible for the kids so mom and dad don’t have to constantly be moving a car every time junior wants to ride around the block.
Time to invest
Hammering up a couple nails to hold the rake and shovel is old school and frowned upon in the reorganization world. Plan on investing a bit of money to get the most bang for your cleanup buck. Adjustable snap-lock hanger systems, plastic or metal shelving units, and a component-based work bench and storage cabinet system allow the garage owner to configure the space to their desired needs. Reorganization kits and supplies take into account that the center of the garage is for a car. But the walls can, and should be, utilized from the ground to the ceiling.
If you install it, they will come
Have a plan and stick to the plan when it comes time to re-fill the garage. Mount your fittings and hang the tools. Install the work bench and go ahead and fill the drawers and organize your tools. Having the component and letting it be a catch-all for organizing at a later date puts you right back at square one. Shelving units do no good still in the box propped up in the corner. Build them and fill them.
An organized garage is a helpful tool for any homeowner. And an organized homeowner is a happy one. Clutter gone.
Is your garage in need of some remodeling and renovation? Contact us today for a free estimate!
How much do you spend on utilities? Are you looking for ways to save? A typical American household spends about $2,100 on energy bills each year, according to the U.S. Environmental Protection Agency (EPA). Most of that expense comes from a home’s energy use during the winter heating season. But a quick home checkup can help you can reduce these costs, prepare for winter and enjoy energy savings.
Properly installed and maintained windows and doors can help keep your home more comfortable year-round. Save on heating costs by preparing your windows and doors for winter with these tips:
* Clear sills and moving parts of dirt and debris. Debris like sand, dirt or leaves can get caught in windowsills and moving parts of windows or doors. Clean these areas with a dry paintbrush to create a tighter seal and enhance window and door performance.
* Check weather stripping. Re-attach or replace missing or worn weather stripping around windows and doors. Loose weather stripping can let cold air in during the winter and out in the summer, reducing energy efficiency.
* Reapply caulk or sealant around windows and doors. Reseal areas around windows and doors that may have been exposed to heavy weather or extreme sunlight – creating breaks in caulk or sealant – to help reduce potential drafts and leaks.
* Installing snap-in blinds or shades. Install snap-in blinds or shades to help insulate your home from cold outdoor temperatures. Pella Designer Series windows and patio doors feature convenient between-the-glass options to add energy efficiency and privacy.
* Repair or replace damaged exterior surfaces. Cracked or deteriorated wood associated with water penetration may allow moisture or cold air to leak into your home. Look closely for signs of moisture leakage and replace damaged wood. Consult a professional to help correct any roof or drainage problems around your home.
* Install storm doors. Storm doors add an extra layer of protection and help reduce air and moisture leakage. Adding a Pella storm door to your exterior doors can reduce energy loss through the entryway by up to 45 percent.
* Replace old windows and doors with energy-efficient ones. If you have single-pane glass, clear glass, or older windows or doors, you may be paying more to heat your home in the winter and cool it in the summer. Replace old windows with energy-efficient, double or triple-pane glass versions made with insulating argon, or install new durable fiberglass doors to help save money and energy year-round.
Contact us today for a free estimate to have new energy efficient windows and doors installed before the cold weather hits!
Though we often ignore it, flooring is a major part of our everyday lives. We’re pretty much in contact with it every moment we’re indoors. So when your carpet needs to be replaced, here are some helpful tips!:
Signs your Carpet Needs to be Replaced
Sometimes, all a dingy carpet needs is to a nice strong power-cleaning. But there are signs that you should just give up on the floor beneath your feet and opt for an upgrade:
You just had your carpet professionally cleaned, and it still smells like cat pee, old coffee, or something unidentifiable.
Every time you walk through a doorway, you trip over the carpet that’s no longer attached to the ground.
You notice no difference in foot comfort when walking on your carpet and walking in your garage. Actually, the garage floor might be more pleasant.
Your carpet is older than your kids, who now have kids and carpet of their own.
Good Times to Replace your Carpet
Having your carpet replaced is a big project. You have to choose a company, pick out the flooring you want, and then get your house ready for the installation-meaning all the furniture will have to be moved. It’s a big task, and there are definitely some optimal times to complete it.
After your kids become less accident prone. If you have a toddler, there’s no point getting your carpet replaced. Children spill, tear, and otherwise abuse the floor no matter how new and pretty it is. Once your kids are older, it will be easier to get them to respect the investment your put into carpet replacement. This way, you won’t have to get new carpet every two years.
After your pets are housetrained. Accidents happen, but if you have a puppy or kitten, wait til they’ve learned where to do their business and that scratching the carpets and couches is not okay. Likewise, after you get a new carpet, you might want to refrain from bringing untrained animals into your home.
When the weather is nice. If a lot of furniture needs to be moved, you’ll appreciate the space that outside has to offer. This isn’t really an option if it’s the middle of hurricane season or there’s a snow-storm going on. Conversely, the carpet installers will appreciate not having to break their backs on a super-hot day.
Finding the best deal
There are a lot of things to consider when you’re deciding on new carpet. You want something that is durable, while also matching your design preferences. You might have limited days that you’re available for contractors to work, or a deadline by which you want the carpet installed. All of these factor into who you will choose. But how do you find these companies in the first place?
Word of Mouth: Ask your friends and family who they’ve had good experience with in the area. When people are unhappy with service, they’ll let others know. People you know are probably the most reliable way to get honest reviews.
Get Estimates: Not only will getting estimates from several companies help you figure out your budget, but it will also enable you to get a preview of what each company is like to work with. You can get local carpet estimates for free at websites with a strict vendor review process.
New carpet is a big commitment and investment, but with the right considerations and planning, you can replace your worn-down, torn-up, smelly floor in no time. And when your feet are happier, the rest of you will be too.
Thomas Greeley writes about home renovations, real estate, and home design. He has never lived in the same place for more than five years, and plans to continue this trend so that he can experience even more cultures, people, and scenic views.
There’s no better time than now to give your home the attention it deserves. Give it an annual checkup before cold weather arrives to help add comfort, save energy and cut home maintenance in the long-run.
When inspecting your home’s windows and doors, here’s what to check:
Inspect interior and exterior finishes: Over time, paint and stain can weather away. Flaking or peeling may mean that it’s time to refinish or replace the unit. When replacing windows or doors, consider factory prefinished wood or fiberglass options from Pella, or vinyl options that don’t need painting or staining, to save time and money.
Look for damaged exterior surfaces or signs of leaks: Check your sprinkler system to make sure it’s watering your lawn and landscape, not soaking your windows or doors. Cracked or deteriorated wood may be a sign of water penetration. Leaks can linger and affect interior walls, floors or ceilings, so look closely for discoloration or other moisture signs.
If you spot a problem, track its trail. For example, discolored trim around a window might actually be caused by moisture entering a ways away. With a leaky roof, water may run down inside the wall and appear at the window. Contact us for help in making home repairs.
Clear windowsills and tracks of dirt and debris: Sand, leaves, insects or pine needles stuck in weather-stripping can affect the performance of your windows and doors. Open the windows and clean the opening with a soft brush, like a dry paint brush or vacuum attachment. Do the same for sliding patio doors.
Try opening and closing: Open your windows and doors to make sure moving parts work, and units close properly. Replace worn or broken parts.
Inspect weather-stripping: Re-attach loose weather-stripping around windows or doors, and replace material that’s ripped or torn.
Replace or repair broken locks: If locks feel loose or don’t work smoothly, replace them. Keep windows and doors locked when not in use. Locks help hold doors and windows tightly, to lock out rain, wind, snow and insects.
Inspect weep and breather holes: Weep holes in the exterior of windows, allow excess moisture to escape, while breather holes allow air exchange within certain components. Clear blocked holes of dirt or debris with a wire or toothpick.
Check exterior sealants and caulk on and around windows and doors. Pay attention to areas susceptible to rain, water and extreme sunlight. Remove damaged material and reapply sealant.
Feel for signs of air leakage around the window or door: Improperly installed windows or doors can be drafty, decrease energy efficiency, and allow unwanted moisture into your home. To help save on utility bills and keep your home more comfortable year-round, replace drafty old, leaky windows with new, ENERGY STAR-qualified Pella windows installed properly.
Are your windows old and drafty? Contact us today and get them replaced before the cold weather arrives!
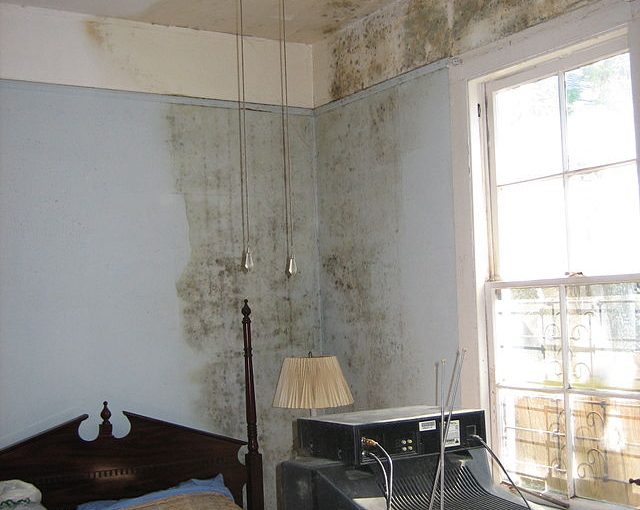
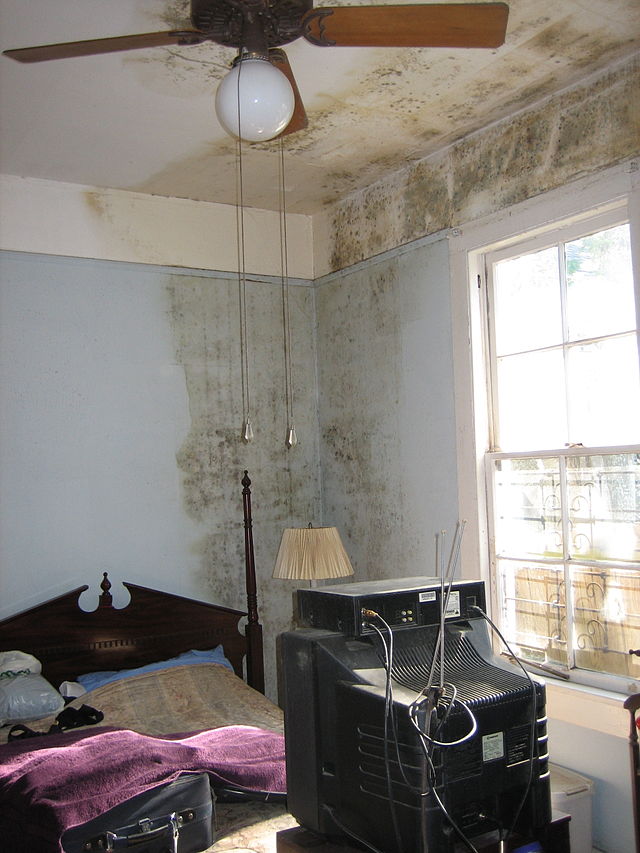
Identifying damp on your living room wall or having a survey come back that indicates damp problems can be worrying. Damp proofing is something that the average property owner knows very little about. Most of us will have heard the words ‘damp proof course’, but many people are unsure as to whether it’s a damp treatment or an educational course.
How do I know if my property requires damp proofing?
Visible damp patches on interior walls, as well as wallpaper peeling, lifting or cracking are all common signs of damp. But there’s no need to panic, as not all damp problems are expensive or complex to repair. If you do notice signs of damp, it’s important that you take action as soon as possible; ignoring the damp problem may make it worse and result in more expensive repairs further down the line. If you are unsure as to whether your property requires damp proofing, it’s recommended that you get in touch with damp proofing specialists like https://protenservices.co.uk/local-branches/nottingham/
Damp problems can be broken down into three main categories, these are:
Rising Damp
This is the rarer of the three damp problems listed and is regularly misdiagnosed by homeowners. Rising damp occurs when water is allowed to enter a structure via the pours in the masonry. Mortar beds tend to be the most absorbent area of the wall, causing the damp to rise upwards via capillary action from below the ground. Capillary action occurs when water molecules are attracted to the molecules of mineral surfaces.
Rising damp usually occurs when water is sucked upwards into masonry from ground level. This works in the same way that a sponge absorbs water when placed on a wet surface. The majority of houses have a damp proof course in place to prevent this. A damp proof course consists of layers of waterproof materials laid into the foundation walls of a property, near to the ground to prevent dampness from rising into the building.
Externally, mortar may start to crumble and salt stains might appear on walls. In extreme cases of rising damp, mortar and player may even fall away from the affected wall. Internally, crumbling plaster, peeling wallpaper and paint are all common problems associated with rising damp.
Penetrating Damp
This happens when water penetrates and soaks through walls. The most common causes of penetrating damp include external defects such as damaged brick, leaking guttering or rainwater pipes that leak at the joints. Other causes include cracked rendering or a lack of sealant between walls and windows.
Penetrating damp can cause damp patches to appear internally on floors, walls or ceilings and negative long term problems that include damage to interior decoration and the decay of plaster and timber. Unsightly mold and other fungal growth may also start to appear. Griffin Contracting & Restoration says, “The longer water damage goes untreated, the more problems arise; rot, mold and decay can destroy a home in ways the homeowner is completely unaware of until it occurs.”
Defects that lead to penetrating damp include:
Porous bricks, after a while all bricks become porous.
Roof defects such as Cracked slates, missing tiles or faulty flashing
Faults in the masonry such as cracked pointing
Obstructed downpipes
Blocked weep holes
Defective mastic around doors or windows
A drip groove that is blocked with dirt, moss or cement
Defective trays in cavity walls
Damp Caused by condensation
Condensation is the most common type of damp and is typically caused by moist air condensing on interior walls. It’s completely different from penetrating and rising damp in that it’s caused by excessive moisture that cannot escape, rather than damp coming in. The problem occurs the most at winter, as at this time of the year the walls are significantly colder than the air inside. In most cases condensation is caused as a result of inadequate ventilation and modern living issues.
Poor heating that comes on and off is another common cause of condensation, as this allows damp, warm air to condense. A tell tale sign that condensation is a problem is when mould begins to appear on interior walls, ceilings and furnishings. There is usually a musty damp smell and items in cupboards can become covered in a green or white furry mould. If left untreated, condensation can cause damage to paint, plaster and even cause window frames to decay.
5 Tips to prevent condensation:
Open your windows everyday to keep your home well ventilated
When cooking, always turn the extractor fans on a high power. This will allow them to extract excess moisture from pots, pans and other appliances.
Always keep the lids on pots and pans when cooking; this will prevent moisture from escaping. If the lids are not kept on, the moisture will rise from the pans even if you cannot see it.
If possible, dry your clothes outside. If you are unable to do this then dry them in an enclosed room with the window open.
Always open your windows after taking a bath or shower; this will prevent condensation from forming on the windows. It’s also important that you keep the bathroom door shut as this will prevent moisture from escaping to other parts of your home.
Author by-line:
This article was contributed by David at Protectahome Ltd
Did you know that your water heater is the second biggest energy hog in your home? It accounts for at least 14 to 18 percent of the total energy cost!
Fortunately, apart from the introduction of the highly efficient and economical gas hot water systems, there are several proven ways you can dramatically reduce your water heater energy consumption.
Listed below are some practical energy-saving tips to get you off to a good start.
Reduce hot water usage.
If there are 4 of you in the family and you shower for at least 5 minutes daily, you will end up consuming approximately 700 gallons of water per week. If you do the math, that’s already a 3-year supply of drinking water for one individual! Fortunately, there are other ways to reduce your water consumption apart from not staying in the shower for too long. For starters, you can look into installing faucet aerators and low-flow showerheads to help reduce your consumption by as much as 25 to 60 percent. As an added bonus, you can end up saving on your water bill, too! Furthermore, the simple installation of the aforementioned basic fixtures can help save up to 14,000 gallons of water annually.
Ensure exposed hot-water pipes are insulated.
When you insulate your hot water pipes, it will mean water will be 2 to 4 degrees warmer when it gets to the faucet. This spares you from having to wait for too long for it to heat up. On the brighter side, you will also end up saving water, energy and money. While oftentimes seen as a cost-effective DIY job, slipping self-sealing sleeves over your pipes can be time-consuming. However, it is deemed by many as a highly effective way to dramatically cut down your water heater energy consumption.
Keep your tanks sediment-free.
Build-up of sediment in the tank is one of the common reasons known to reduce water heater efficiency. That being said, it makes saving on energy difficult, if not impossible. Fortunately, keeping the tank free from sediment is straightforward and easy. Start by turning off the water and setting the burner to ‘pilot’. Then proceed by connecting a garden hose to the spigot located at the tank’s base. Start the water flowing by lifting the pressure-relief valve and turning off the spigot of the tank. Also, it is reassuring to know draining does not have to be done often. Once or twice annually will do the trick.
Reduce your tank’s thermostat
While it’s not common knowledge, you will end up saving at least 3 to 5 percent on your energy bill every time you turn your tank’s thermostat 10 degrees down. In most instances, water heaters have a preset setting of 140 degrees. Ideally, however, the recommended setting for most households is just 120 degrees. If you happen to own a water heater that does not come with a numbered gauge, the midway between the ‘low’ and ‘medium’ marks is often considered the ideal setting.
Undoubtedly, waging a war against water heater energy consumption can be tough. Fortunately, if you apply any or all of the abovementioned practical tips, then you have a higher chance of winning the battle.
If you have a septic system, chances are you don’t think about it often. For the most part, as long as it’s doing what it’s supposed to be doing, you may not even really care about it.
What is a septic system? How big are they? What does it cost to replace one? Arm yourself with the knowledge of what a septic tank is and how to maintain one, in case something goes wrong.
What is a Septic Tank?
A septic tank is one part of the overall septic system. As a homeowner, you should know where your septic tank is and how old it is. Generally, septic tanks last about 20 years but they need regular pumping to remove buildup, sludge and scum. Residential septic tanks are required in neighborhoods where there is no connection to the city’s main sewage pipes.
About 25 percent of the homes in the United States rely on septic systems. Most septic systems have four components: a pipe leading from the home, a septic tank, a drainage field or leach field, and soil. Microbes in the soil are responsible for removing many of the contaminants from the wastewater you produce before it hits the groundwater. The septic tank itself is a watertight container made out of concrete, fiberglass or polyethylene and is buried underground to hold wastewater. From this wastewater, solids settle to form sludge, and oils come to the surface, known as scum. Special compartments and screens keep the sludge and scum from entering the drainfield.
Tips to Protect Your Septic System
To keep your septic system in good working order, it’s necessary to have it pumped out regularly. How often you do this depends on many factors, including family size, tank size and the volume of solids. For example, if you have a 900 gallon-tank for a family of four, you’ll need to pump it every two years. If you’ve got a 1500-gallon tank, you can get away with every four years. Also, if you have a garbage disposal, you’re dumping more solids into your tank than someone without a disposal — 50 percent more in fact.
Maintaining your septic system not only contributes to the life span of the unit, it also protects the investment in your home. If you don’t have it pumped regularly, it can back up and malfunction, contaminating the groundwater and thus the drinking water. It can also cost thousands of dollars to replace the tank. You could become legally responsible if you have a malfunctioning septic tank or one that’s not in use or in disrepair, which could make your property value plummet.
Pumping your system every couple of years at between $100 and $300 pales in comparison with the average cost of replacing a septic tank, which could run you between $3,000 and $10,000. Get in a regular maintenance plan with a company in your area so you are always on top of your pumping schedule. If you let it go too long, you will be met with some unpleasant signs your tank is overflowing, from an awful smell to backed up toilets. Some of the newer systems feature convenient alert systems when the tank is approaching full capacity.
You have to be careful with your septic system, as its capacity to handle bulky items is much less than a city sewage system. For instance, never flush dental floss, cotton swabs, feminine hygiene products, condoms, diapers, cat litter or paper towels, as they could damage the septic system. Likewise, if you flush chemicals, oil, pesticides, antifreeze or paint down the toilet, these harmful substances can harm the system’s biological treatment process and accumulate in the groundwater. Taking proper care of your septic tank and related system is important to keeping it in tip-top shape.
This article was provided by Matt Jeffries, on-site contract manager and all-around handy man. If you need an extra hand with your plumbing, Matt recommends Doug Turner Plumbing.