How much do you spend on utilities? Are you looking for ways to save? A typical American household spends about $2,100 on energy bills each year, according to the U.S. Environmental Protection Agency (EPA). Most of that expense comes from a home’s energy use during the winter heating season. But a quick home checkup can help you can reduce these costs, prepare for winter and enjoy energy savings.
Properly installed and maintained windows and doors can help keep your home more comfortable year-round. Save on heating costs by preparing your windows and doors for winter with these tips:
* Clear sills and moving parts of dirt and debris. Debris like sand, dirt or leaves can get caught in windowsills and moving parts of windows or doors. Clean these areas with a dry paintbrush to create a tighter seal and enhance window and door performance.
* Check weather stripping. Re-attach or replace missing or worn weather stripping around windows and doors. Loose weather stripping can let cold air in during the winter and out in the summer, reducing energy efficiency.
* Reapply caulk or sealant around windows and doors. Reseal areas around windows and doors that may have been exposed to heavy weather or extreme sunlight – creating breaks in caulk or sealant – to help reduce potential drafts and leaks.
* Installing snap-in blinds or shades. Install snap-in blinds or shades to help insulate your home from cold outdoor temperatures. Pella Designer Series windows and patio doors feature convenient between-the-glass options to add energy efficiency and privacy.
* Repair or replace damaged exterior surfaces. Cracked or deteriorated wood associated with water penetration may allow moisture or cold air to leak into your home. Look closely for signs of moisture leakage and replace damaged wood. Consult a professional to help correct any roof or drainage problems around your home.
* Install storm doors. Storm doors add an extra layer of protection and help reduce air and moisture leakage. Adding a Pella storm door to your exterior doors can reduce energy loss through the entryway by up to 45 percent.
* Replace old windows and doors with energy-efficient ones. If you have single-pane glass, clear glass, or older windows or doors, you may be paying more to heat your home in the winter and cool it in the summer. Replace old windows with energy-efficient, double or triple-pane glass versions made with insulating argon, or install new durable fiberglass doors to help save money and energy year-round.
Contact us today for a free estimate to have new energy efficient windows and doors installed before the cold weather hits!
There’s no better time than now to give your home the attention it deserves. Give it an annual checkup before cold weather arrives to help add comfort, save energy and cut home maintenance in the long-run.
When inspecting your home’s windows and doors, here’s what to check:
Inspect interior and exterior finishes: Over time, paint and stain can weather away. Flaking or peeling may mean that it’s time to refinish or replace the unit. When replacing windows or doors, consider factory prefinished wood or fiberglass options from Pella, or vinyl options that don’t need painting or staining, to save time and money.
Look for damaged exterior surfaces or signs of leaks: Check your sprinkler system to make sure it’s watering your lawn and landscape, not soaking your windows or doors. Cracked or deteriorated wood may be a sign of water penetration. Leaks can linger and affect interior walls, floors or ceilings, so look closely for discoloration or other moisture signs.
If you spot a problem, track its trail. For example, discolored trim around a window might actually be caused by moisture entering a ways away. With a leaky roof, water may run down inside the wall and appear at the window. Contact us for help in making home repairs.
Clear windowsills and tracks of dirt and debris: Sand, leaves, insects or pine needles stuck in weather-stripping can affect the performance of your windows and doors. Open the windows and clean the opening with a soft brush, like a dry paint brush or vacuum attachment. Do the same for sliding patio doors.
Try opening and closing: Open your windows and doors to make sure moving parts work, and units close properly. Replace worn or broken parts.
Inspect weather-stripping: Re-attach loose weather-stripping around windows or doors, and replace material that’s ripped or torn.
Replace or repair broken locks: If locks feel loose or don’t work smoothly, replace them. Keep windows and doors locked when not in use. Locks help hold doors and windows tightly, to lock out rain, wind, snow and insects.
Inspect weep and breather holes: Weep holes in the exterior of windows, allow excess moisture to escape, while breather holes allow air exchange within certain components. Clear blocked holes of dirt or debris with a wire or toothpick.
Check exterior sealants and caulk on and around windows and doors. Pay attention to areas susceptible to rain, water and extreme sunlight. Remove damaged material and reapply sealant.
Feel for signs of air leakage around the window or door: Improperly installed windows or doors can be drafty, decrease energy efficiency, and allow unwanted moisture into your home. To help save on utility bills and keep your home more comfortable year-round, replace drafty old, leaky windows with new, ENERGY STAR-qualified Pella windows installed properly.
Are your windows old and drafty? Contact us today and get them replaced before the cold weather arrives!
Why Does My Air Conditioner Keep Breaking?
Common Air Conditioning Problems and Their Causes
With the heat of summer upon us, there’s no better relief than the cool breeze of an air conditioner. However, that chilly relief can quickly disappear due to several common air conditioner problems. Air conditioners are complex machines that can suffer from various issues due to lack of maintenance, age or damage. Here are some examples of the most common problems that air conditioners can suffer from to help you get out of the heat and into the cool once again.
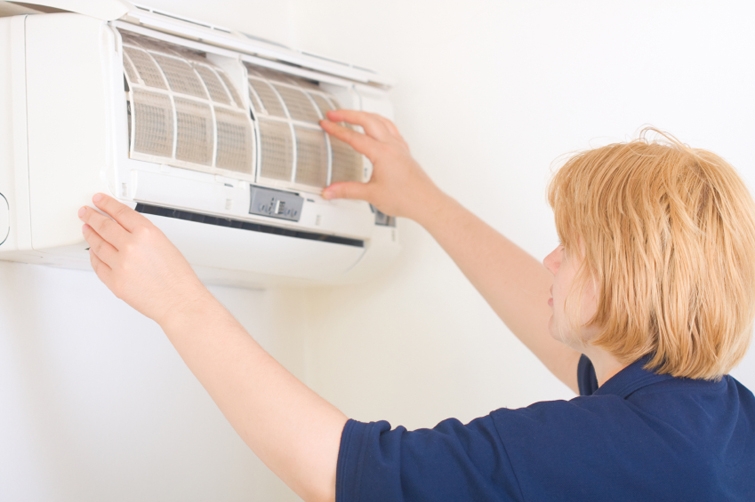
Air conditioners work by taking hot air from the room, expelling it outside and circulating in cool air. However, a dirty air filter can easily cause the air flow to decrease. Low air flow means it takes much longer for the room to cool down, which wastes energy and puts unnecessary wear and tear on the unit.
The filter should always be checked and cleaned at the beginning and end of the season to ensure that it’s always fairly clean. It’s also a good idea to check the filter at least once a month to see if there is significant buildup. If there is, a quick vacuuming or rinsing it in the bathtub will make it as good as new.
Faulty Wiring
Wiring issues are actually fairly easy to detect in units with digital control panels. If the display doesn’t activate at all or shows errors, there’s likely a wiring issue present. If the panel lights up and shows no errors, it could still possibly be a wiring issue, but the chances are low. Another sign of failing wiring is if the unit turns off randomly or has difficulty turning on.
Wiring issues typically occur over time due to accidental damage, wear and tear and possibly animals. It’s always best to consult a professional when diagnosing and repairing wiring problems.
Refrigerant Leaks
Possibly the most important aspect of your air conditioner is the refrigerant. It is a chemical substance that cools down the air that enters the room. Without it, your air conditioner is really nothing more than a big fan. If your air conditioner is not blowing cool air and the filter is clean, it may indicate that the unit is low on refrigerant and possibly leaking.
Refrigerant can be replaced fairly easily, but it generally shouldn’t need to be refilled unless it wasn’t properly filled to begin with. A professional can check for and repair any leaks in the unit for you.
Drainage Problems
Air conditioners also act as dehumidifiers, which means they need to be able to drain all of the water that they remove from the air. That is why it is suggested that air conditioners be installed at a downward angle to ensure that the excess water can merely drip off of the back of the unit. Some bigger units may have a separate drainage hose to help remove the water. Drainage issues can cause the unit to suddenly shut off and it may also cause corrosion and damage to internal parts.
Drainage problems are also fairly easy to diagnose as they typically cause a noticeable tapping or dripping noise when the unit is active. Some units also have an indicator on the front that can tell you when there’s a problem with the drainage system. Luckily, it’s also fairly simple to fix most drainage issues. Repositioning the unit to point downwards can help drain the water. You can use a small piece of wood to help raise the front end if necessary. You can also carefully drill some holes in the bottom of the unit to help it drain. Keep in mind that this will likely void your warranty. In addition, ensure that you drill in areas that are open and away from important mechanical parts. For a drainage hose, remove the hose and ensure that there are no obstructions such as leaves, grime or even small animals. Ensure that the hose is properly installed as well.
Conclusion
Like any machine, air conditioners are vulnerable to damage, wear and tear, lack of maintenance and more. Luckily, most of these problems are not irreparable. With a keen eye, some simple maintenance and perhaps the help of a professional, you can get your air conditioner back in proper working order to help beat the summer heat.
Identifying damp on your living room wall or having a survey come back that indicates damp problems can be worrying. Damp proofing is something that the average property owner knows very little about. Most of us will have heard the words ‘damp proof course’, but many people are unsure as to whether it’s a damp treatment or an educational course.
How do I know if my property requires damp proofing?
Visible damp patches on interior walls, as well as wallpaper peeling, lifting or cracking are all common signs of damp. But there’s no need to panic, as not all damp problems are expensive or complex to repair. If you do notice signs of damp, it’s important that you take action as soon as possible; ignoring the damp problem may make it worse and result in more expensive repairs further down the line. If you are unsure as to whether your property requires damp proofing, it’s recommended that you get in touch with damp proofing specialists like https://protenservices.co.uk/local-branches/nottingham/
Damp problems can be broken down into three main categories, these are:
Rising Damp
This is the rarer of the three damp problems listed and is regularly misdiagnosed by homeowners. Rising damp occurs when water is allowed to enter a structure via the pours in the masonry. Mortar beds tend to be the most absorbent area of the wall, causing the damp to rise upwards via capillary action from below the ground. Capillary action occurs when water molecules are attracted to the molecules of mineral surfaces.
Rising damp usually occurs when water is sucked upwards into masonry from ground level. This works in the same way that a sponge absorbs water when placed on a wet surface. The majority of houses have a damp proof course in place to prevent this. A damp proof course consists of layers of waterproof materials laid into the foundation walls of a property, near to the ground to prevent dampness from rising into the building.
Externally, mortar may start to crumble and salt stains might appear on walls. In extreme cases of rising damp, mortar and player may even fall away from the affected wall. Internally, crumbling plaster, peeling wallpaper and paint are all common problems associated with rising damp.
Penetrating Damp
This happens when water penetrates and soaks through walls. The most common causes of penetrating damp include external defects such as damaged brick, leaking guttering or rainwater pipes that leak at the joints. Other causes include cracked rendering or a lack of sealant between walls and windows.
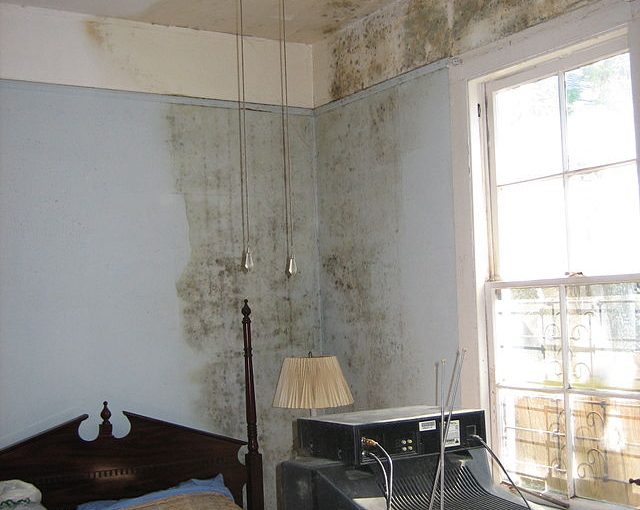
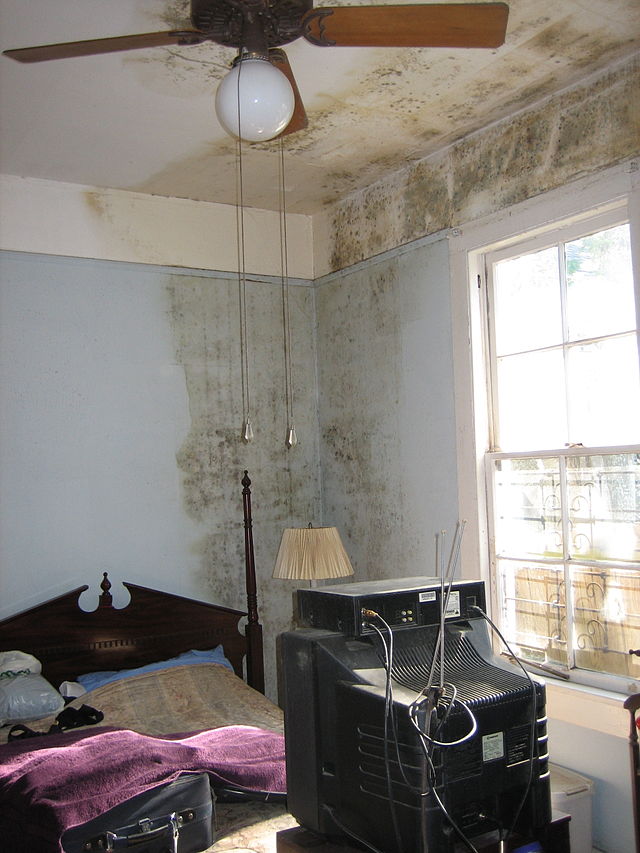
Penetrating damp can cause damp patches to appear internally on floors, walls or ceilings and negative long term problems that include damage to interior decoration and the decay of plaster and timber. Unsightly mold and other fungal growth may also start to appear. Griffin Contracting & Restoration says, “The longer water damage goes untreated, the more problems arise; rot, mold and decay can destroy a home in ways the homeowner is completely unaware of until it occurs.”
Defects that lead to penetrating damp include:
Porous bricks, after a while all bricks become porous.
Roof defects such as Cracked slates, missing tiles or faulty flashing
Faults in the masonry such as cracked pointing
Obstructed downpipes
Blocked weep holes
Defective mastic around doors or windows
A drip groove that is blocked with dirt, moss or cement
Defective trays in cavity walls
Damp Caused by condensation
Condensation is the most common type of damp and is typically caused by moist air condensing on interior walls. It’s completely different from penetrating and rising damp in that it’s caused by excessive moisture that cannot escape, rather than damp coming in. The problem occurs the most at winter, as at this time of the year the walls are significantly colder than the air inside. In most cases condensation is caused as a result of inadequate ventilation and modern living issues.
Poor heating that comes on and off is another common cause of condensation, as this allows damp, warm air to condense. A tell tale sign that condensation is a problem is when mould begins to appear on interior walls, ceilings and furnishings. There is usually a musty damp smell and items in cupboards can become covered in a green or white furry mould. If left untreated, condensation can cause damage to paint, plaster and even cause window frames to decay.
5 Tips to prevent condensation:
Open your windows everyday to keep your home well ventilated
When cooking, always turn the extractor fans on a high power. This will allow them to extract excess moisture from pots, pans and other appliances.
Always keep the lids on pots and pans when cooking; this will prevent moisture from escaping. If the lids are not kept on, the moisture will rise from the pans even if you cannot see it.
If possible, dry your clothes outside. If you are unable to do this then dry them in an enclosed room with the window open.
Always open your windows after taking a bath or shower; this will prevent condensation from forming on the windows. It’s also important that you keep the bathroom door shut as this will prevent moisture from escaping to other parts of your home.
Author by-line:
This article was contributed by David at Protectahome Ltd
Spring is in the air, so it’s time to give your home an exterior makeover and add curb appeal. A few simple tricks can help boost your home’s profile, and ensure visitors get a good first impression when they arrive on your doorstep.
Make a statement with your front door
Your front door is one of the first things people notice about your home. Is your door drab, drafty or just plain past its prime? Make a bold statement and improve your home’s energy efficiency with a new Energy Star-qualified front door. Consider options with decorative glass accents and stunning sidelights to add more natural light while maintaining a sense of style and privacy.
“Pella entry doors feature stylish options in a variety of popular materials from wood to fiberglass and steel options, and the real beauty is in their performance,” says Kathy Krafka Harkema of Pella Windows and Doors. “When replacing your old front door, choose from one that accents your home’s style, with high-performance features that help keep out air and water, and low-maintenance convenience like durable prefinished options with coordinating trim.”
Accessorize with new hardware
Replace your front door hardware for a quick, easy facelift. Choose hardware finishes consistent with those of your home’s light fixtures, mailbox and house numbers to maintain a polished, cohesive look. You’ll be surprised what a difference new hardware on your front door can make in creating a positive look and feel.
Refresh exterior and trim colors
Now’s also time to add a new storm door to help keep out the elements, or to add a refreshing coat of paint on your existing exterior doors for a fresh look.
For a dramatic change, repaint your home’s exterior. You can also change trim color to refresh your home’s exterior impact. When updating trim, choose color schemes that match your home’s primary exterior color, or complement it with a fresh twist.
Accent with lighting
For night-time curb appeal and safety, add a row of exterior accent lighting to illuminate a walking path with ground-insert solar lights. Or consider solar spotlights to bring out landscaping or architectural focal points. Install new matching light fixtures outside your front door, garage door or patio door to create an inviting feel and provide well-lit doorways to greet you and visiting neighbors and guests.
Create points of interest with plants
Add pops of color by arranging potted plants around your front door, or on a porch or deck. Incorporate planters or container gardens of varied sizes, shapes and colors to add visual interest. Also, planting flowerbeds along driveways and walkways gives your home a softer, more inviting feel.
For more curb appeal inspiration, contact us for a free in home consultation. We are happy to offer our customers high quality Pella products!
If you have a septic system, chances are you don’t think about it often. For the most part, as long as it’s doing what it’s supposed to be doing, you may not even really care about it.
What is a septic system? How big are they? What does it cost to replace one? Arm yourself with the knowledge of what a septic tank is and how to maintain one, in case something goes wrong.
What is a Septic Tank?
A septic tank is one part of the overall septic system. As a homeowner, you should know where your septic tank is and how old it is. Generally, septic tanks last about 20 years but they need regular pumping to remove buildup, sludge and scum. Residential septic tanks are required in neighborhoods where there is no connection to the city’s main sewage pipes.
About 25 percent of the homes in the United States rely on septic systems. Most septic systems have four components: a pipe leading from the home, a septic tank, a drainage field or leach field, and soil. Microbes in the soil are responsible for removing many of the contaminants from the wastewater you produce before it hits the groundwater. The septic tank itself is a watertight container made out of concrete, fiberglass or polyethylene and is buried underground to hold wastewater. From this wastewater, solids settle to form sludge, and oils come to the surface, known as scum. Special compartments and screens keep the sludge and scum from entering the drainfield.
Tips to Protect Your Septic System
To keep your septic system in good working order, it’s necessary to have it pumped out regularly. How often you do this depends on many factors, including family size, tank size and the volume of solids. For example, if you have a 900 gallon-tank for a family of four, you’ll need to pump it every two years. If you’ve got a 1500-gallon tank, you can get away with every four years. Also, if you have a garbage disposal, you’re dumping more solids into your tank than someone without a disposal — 50 percent more in fact.
Maintaining your septic system not only contributes to the life span of the unit, it also protects the investment in your home. If you don’t have it pumped regularly, it can back up and malfunction, contaminating the groundwater and thus the drinking water. It can also cost thousands of dollars to replace the tank. You could become legally responsible if you have a malfunctioning septic tank or one that’s not in use or in disrepair, which could make your property value plummet.
Pumping your system every couple of years at between $100 and $300 pales in comparison with the average cost of replacing a septic tank, which could run you between $3,000 and $10,000. Get in a regular maintenance plan with a company in your area so you are always on top of your pumping schedule. If you let it go too long, you will be met with some unpleasant signs your tank is overflowing, from an awful smell to backed up toilets. Some of the newer systems feature convenient alert systems when the tank is approaching full capacity.
You have to be careful with your septic system, as its capacity to handle bulky items is much less than a city sewage system. For instance, never flush dental floss, cotton swabs, feminine hygiene products, condoms, diapers, cat litter or paper towels, as they could damage the septic system. Likewise, if you flush chemicals, oil, pesticides, antifreeze or paint down the toilet, these harmful substances can harm the system’s biological treatment process and accumulate in the groundwater. Taking proper care of your septic tank and related system is important to keeping it in tip-top shape.
This article was provided by Matt Jeffries, on-site contract manager and all-around handy man. If you need an extra hand with your plumbing, Matt recommends Doug Turner Plumbing.
With the start of the new year, now is the perfect time for homeowners to set some personal resolutions that will help protect their most valuable investment. While most homeowners start out with a solid plan for paying off their loans and performing needed repairs, it is easy to fall off course over time. Here are five resolutions that every homeowner should have in mind when setting goals this year that will pay off in higher home values and financial security over the upcoming years.
Keep Up with Seasonal Maintenance
It often seems as though seasonal maintenance never ends. However, completing basic home maintenance tasks every season is one of the most effective ways to prevent serious problems from occurring. For example, something as simple as keeping trees trimmed back from the home can prevent roof damage as well as pest infestations. Head off problems now by resolving to establish a regular schedule for seasonal maintenance, and plan ahead of time by having a list of contractors on hand that can handle any tasks that are too tough to tackle alone.
Ensure Coverage for Emergencies
An essential part of homeownership is having a plan in place for emergencies. This year, homeowners should resolve to purchase house insurance plans that will help ensure their financial security in the event of an emergency. Those who already have a home warranty will also need to double check to make sure it provides adequate coverage. For example, new additions to the home, such as a swimming pool or new appliances, may mean that it is time to purchase a new policy or upgrade a current one.
Complete a Home Inventory
Upon moving into a new home, a person should have conducted a thorough home inventory that can be used to file a claim in the event of damages incurred. However, it is common for these inventories to fall out-of-date as new property is acquired. The beginning of the year is the ideal time to assess any new acquisitions such as electronic equipment or outdoor facilities that should be included on a person’s home inventory. Then, the home inventory should be stored in a safe place such as a safety deposit box or in an online storage file.
Make Extra Mortgage Payments
Paying off the mortgage early is a homeowner’s dream come true; however, this goal can only be accomplished with some careful planning. Homeowners can start small by simply resolving to pay one extra mortgage payment a year. Those who have extra money in their budget can take this resolution to the next level by making bimonthly payments that will put them even further ahead of their estimated pay off date. Even if a homeowner makes just one extra payment a year, they will be able to save a significant amount of money over the lifetime of their loan. Finally, those who have experienced a change in their income or credit score may be able to explore refinancing options that can make paying off the mortgage a more feasible reality.
Finish That Home Improvement Project
Every homeowner has some type of home improvement project that has been sitting on the back burner. Whether a person’s plans got off track due to the holidays or the job proved to be too tough to handle alone, now is the time to resolve to get it completed. Set up a schedule for performing any remaining steps in the project, or hire a contractor who can finish it up correctly. This will help to get the new year off to a better start so that a person’s schedule can be clear for handling any additional repair projects that arise during the upcoming year.
Although it is always a great idea to make New Year’s resolutions to lose weight or save more money, it is also essential to take a good, long look around the home to check for any resolutions that could contribute to a better lifestyle. By taking stock of their current home mortgage and associated policies, homeowners can prepare for the years ahead while taking advantage of every opportunity to protect their most valuable investment.
Think Safety First Before You Tackle That DIY Project!
You might think that you could save money by just doing the work yourself if you are looking to remodel your home and, yes, you could save some money on things like supplies and man-hours involved with the job but what about the inherent risks and sacrifice’s that come with most home renovation projects?
First off, you need training. Demo and construction workers are trained well in what they do. They know the proper safety equipment needed, the dangers for specific jobs and are covered by insurance companies for any accidents that could happen on the job.
And accidents can happen.
Another Brick in the Wall
You might think knocking down a wall is as easy as grabbing a large mallet and swinging away like you’re Babe Ruth looking to knock another ball out of the park. And it can be that easy, as long as you’re fine with possibly hitting a live wire, damaging pipes that you didn’t know were in the wall, having the wall collapse on you and breathe in particles such as asbestos and lead dust. Most people don’t know what materials were used in building their house and breathing in either of those things can be harmful to your health.
Asbestos is not only deadly; it can cause lung cancer and mesothelioma. Mesothelioma is a rare form of cancer caused by asbestos exposure and affects the protective lining of your organs. It’s common knowledge that lead can have some horrible effects on your body. Breathing too much of that stuff in can cause organ failure and death.
Insulation is Fun!
What about insulation? Surely insulating a room such as the basement is safe and easy, right? I’ve handled plenty of insulation in my time (more than I ever wanted to…) and I’m also an asthmatic. Insulation is one of the more frustrating jobs I had to take on. Just handling it caused major skin irritation and itching. And yes, I was wearing a long sleeved shirt and gloves. The particles stick to your clothing and skin and scratching will just make the rashes appear faster. Breathing in those particles from insulation will also severely irritate your lungs and can cause nose bleeds, coughing and in some cases, cancer.
And this is just with new insulation. Just imagine all the fun stuff such as mildew and mold waiting for you when you have to remove the old insulation. Speaking of mold and mildew, adding new insulation isn’t as simple as just throwing it in the wall and sealing it up. Improper installation of insulation can lead to condensation, which can cause a build-up of mildew and mold.
Your Crack is Showing
Plumbing is a common DIY task that many people attempt. Just buy some pipes, replace the old ones and BAM! Well… it’s not as easy as it sounds and making a mistake can lead to loud noises, bursting pipes or something even worse!
Choosing the proper pipes for the job is extremely important. You will want the best quality pipes for the money and they need to be the proper pipes for the job you are looking for. It’s not as easy as going down to Home Depot and picking a pipe that looks the same or is the right size. You not only need the right pipes for the job, you need the right tools as well. Having a plumber do the job is your best bet with this since they will have years of experience and will know what they are doing.
Another thing to consider is pipe routing. Once the walls are down and you have a look at the plumbing system, it can be quite confusing to the untrained eye. I’ve seen some plumbers take a look at some pipes at a couple job sites and say “What’s going on here…?” And finally, think of the added costs you might have to deal with if you finish the plumbing yourself, turn on the water and all of a sudden, it seems as if Moses himself unleashed the Red Sea inside of your house. Water damage is not cheap to fix. You’ll have to replace everything that was damaged and then pay for the work again.
The Joys of Electrical Work
Oh, electricity. I’ve had a few fun experiences dealing with wiring. Before I get to that though, I should mention that working with electrical wiring without a permit is illegal, so I wouldn’t consider it a DIY job. Especially since if you do decide to do it yourself, you won’t be covered by your insurance company.
Electrical wiring was probably (I swear I won’t make any lame puns) the most dangerous part of the job for me. At one site during my old job, our manager asked me to cut some wires after I got back from lunch. Being the logical, safety-minded person that I am (ahem), I asked if the power was cut from those wires, which earned me a good tongue-lashing from said manager who told me in not-so-nice terms “Of course it is. You think I’m an idiot?”
In retrospect, I should have checked the wires myself. The very first wire I cut through exploded (ok, maybe a little dramatic but it seemed that way to me), melted the blades to my wire cutters and hurt pretty badly. That experience could have ended very badly for me. Thankfully I only walked away shaken and a bit annoyed.
One last thing to remember with electrical wiring is that if the job is poorly done, it can lead to electrical fires or can get someone electrocuted.
Don’t Break Your Back with Roof Repair
Out of all the DIY jobs, I think roofing is probably the most popular. A lot of people just end up with professionals cleaning up the mess.
My piece of advice is to just leave it to the professionals. Save yourself the time and money. First off, you won’t save money buying the materials yourself. And even if you find “cheap” materials, they are probably just that: cheap. You’ll end up having to get the job done all over again sooner than you expected.
You also need to consider safety when attempting to do roofing yourself. You’re going to have to lug your tools up on the roof and there is the danger of dropping one or having all your tools go sliding off and damage a vehicle, your house or even a person.
And roofing isn’t just some easy job you can knock out real fast. If you don’t know what you’re doing, or just have a vague idea, you could end up with an incomplete roof, with a damaged roof, or just giving up in frustration and having to spend even more money having professionals come down and redo everything.
Safety First!
At the end of the day, it all comes down to safety and saving money. You have to weigh the risks of DIY jobs and realize that you are playing the lottery here. On one hand, you might save money, BUT you could end up with low end materials, you could cause damage to your house that will be very expensive and you could seriously hurt or even kill yourself or someone else.
It’s always best to be on the side of caution.
Author Bio
Christian Sculthorp is a contributing writer for Ottawa General Contractors, a full-service home renovation company based in Ottawa, Canada.
When it comes to your home, you may think that once you buy it your worries are over. After all, you will know if there is anything wrong right away. Well, you can be wrong. There are many types of damage that can occur in a home over time that do not show up right away. Small leaks, spots of rot and more can slowly eat away at your home until something devastating does happen. Instead of waiting for the roof to fall in, why not take precautions and prevent disaster from occurring? Regular home inspections can end up saving you a lot of time in the long run. You do not have to hire a professional inspector though. Here are some tips to preform your own home inspection:
The Roof – Start from the top and work your way down. The first thing you should check on your home is the roof. If you can, try to climb on to your roof, carefully of course, and examine it. Feel for spots that are softer than the rest. Look for dark areas where dirt or rain buildup occurs. Your roof should never have spots where leaves or sticks pile up. That is a danger zone for leaks. Make sure the flashings, the metal areas around chimneys and other protuberances, are present and tightly sealed. Keep a lookout for loose tiles and visible nail heads. If you can see the nail, then water can travel down it. Make sure all gutters are clean and suitable for drainage. Clogged gutters can mean standing water on your roof which can lead to leaks and water damage. Also check under overhangs for rotting wood, clogged attic vents, and signs of animal incursions. Animals, like squirrels and mice, can do a lot of damage to a home before you even know they are there. Seal up any holes or cracks to make sure your home is safe from invasion.
The Siding – Once you have completed your inspection of the roof, then it is time to move on down. Most homes have siding, but even those homes with brick or other construction still need to be inspected. Look for cracks that can not only let in pests but can also be a sign of foundation issues. Feel the siding and look for soft spots, bulges, or discoloration that can be a sign of water damage that is hidden from view. Make sure the corners are not peeling or separating from the wall. The siding should be tight and compact, not loose or floppy. Loose siding can easily be caught by the wind in a storm and rip away from your house causing thousands of dollars in damage. Also look for wood rot and signs of termite damage. Catching it early can mean far less work and money invested later on. Make sure any exhaust vents, such as for the clothes dryer, are properly sealed and do not let in pests.
The Foundation – Now you are down to the foundation. This is one of the most important parts of your home. Without a good foundation, the rest of your home will collapse. Foundation issues can be hard to see and often times we have to look for other evidence inside. However, I will get to that in a moment; for now you should look for cracking, settling or movement in your cement foundation. Make sure that there is nothing directly around your foundation. Large trees can cause root damage, bushes can attract pests and fire, and piles of junk can eat away at the dirt around your foundation. For homes not directly on a cement foundation you should get into the crawl space and make sure the home is securely stabilized. Make sure pests cannot live under the home and that the floor of the home is free from any water damage, large cracks or other discrepancies.
The Yard –While you are still outside, take a look at your yard. What does your yard have to do with a home inspection? Sometimes quite a lot. You want your home to be the highest spot in your yard. Creating raised flower beds and other landscaping details can sometimes alter the flow of water and cause flooding or swampy-ness around your home. If you have a septic tank, make sure there is no damage to it and that the dirt and grass around it is not unusual as compared to the rest of the yard. Very green grass, damp soil or water retention are bad signs. Make sure all large trees are far enough from the home to avoid foundation damage or falling limbs. Tree limbs should never touch the roof of your home and any limbs that are dead should be cut off immediately. Keep a fire safety zone around your home by avoiding bushes and shrubbery near the home. This can also help your siding to avoid rot and make your home less appealing for burglary.
The Attic – Now we go inside. Again, we want to start at the top. Go inside your attic and take a look around. The underside of the roof can help you to see water damage and leaks. Look for discolored spots, soft spots, or mold damage. Look at the insulation and make sure there is no damage there either. Pests can often destroy insulation to make nests. Your attic should not be too hot or too cold. If it is, then you may have an issue with ventilation. Your attic temperature determines how hard your home must work to stay a stable temperature so it is important. Take a look at any exposed wiring and look for frayed areas and melted or burned looking wires. This is very dangerous and MUST be addressed immediately. Walk around your attic, if possible, and inspect the ceiling of your home. Make sure everything looks solid and secure. If you have central heating or air in your attic, take a look at that too. Make sure that the drip pan is not full and any exhaust is properly ventilated. Duct work should be inspected to make sure holes are not present and all are securely fastened. Leaky air conditioners are the leading cause of water damaged ceilings. Also inspect any pipes, following along to look for possible leaks.
The Ceiling –Moving down, inspect your home’s ceilings. Look for signs of water damage, cracks, bulges or peeling paint. Water damage and mold can be sneaky. You have to keep your eyes open. Look at heating and cooling vents. Dark areas around vents can mean dirty air ducts. Air ducts should be cleaned regularly both for performance and for safety reasons. Light fixtures and fans should be securely fastened and professionally installed. Never use a higher watt bulb then a fixture is approved for.
The Walls –Now to the walls. The walls are often one of the first places you can see evidence of foundation issues. Cracks appearing in your walls mean that something is going wrong. You should also look for signs of leaky pipes or bad wiring. Touch the walls. If they are significantly hotter or cooler than the rest of your home, you could have a problem. Leaks can cause damp walls to grow mold and bad wiring can cause a series of small, nearly undetectable fires behind your walls. Loose light switches or electrical plugs are also a sign of wiring gone bad.
The Doors and Windows – Another big indicator of foundation issues are doors and windows. Doors that do not shut properly, open at the slightest provocation and windows with large cracks around the edges are all signs of foundation settling or cracking. In inspecting doors and windows you should make sure that any cracks or seams are properly sealed to ward off pests and drafts. Windows should be sealed where they connect also, especially if you do not often open them. Weather sealing can become brittle over time and need to be replaced. Doors should be sealed well, especially underneath. Even a quarter sized gap can admit all kinds of creepy crawlies. Make sure that all storm doors and window screens are secure. A strong wind can cause a lot of damage with unsecured items such as these. Warped or bent doors should be replaced and cracks in widows should be sealed before they spread. Oiling sliding doors and windows can prevent breakage and sticking later on and save you replacement costs. Make sure all moving parts are properly cleaned and oiled.
The Floor – Bubbled, warping, or crooked floors are a bad sign. This can mean water damage or foundation issues. In many areas, such as bathrooms and kitchens, floors are subjected to corrosive things like water and oil. Make sure your flooring is proper for that area. For example, wood floors in a kitchen often absorb oil and become dirty and stained, unhealthy! Carpet or wood in bathrooms can hold moisture and create a breeding place for mold. Non-permeable surfaces, such as tile or linoleum, are preferred for those areas. Keep a look out for signs of pests as well. Mice pellets, small holes, signs of knawing, and dead bugs often mean a larger infestation. Make sure that pest control is high on your list of maintenance issues as they can cause significant damage. Upstairs, look for soft spots or low spots to prevent major issues.
The Faucets – Last but not least we come to the culprit of much damage in the home. Leaky faucets and pipes cause millions of dollars in damage every year. Take a look at the faucets and pipes that are visible in your home. There should be no signs of rust or corrosion, no dampness and no leaks! Even a small leak can cause huge issues. Address any leaky piping immediately to prevent bigger problems later. Remember the toilet is a source of water damage as well, so make sure it is properly sealed. Inspect drains as well to assure they are flowing properly and not in danger of clogging or backing up.
You should perform a home inspection at least every six months and after every big storm. This can help your home to stay in tip top shape and prevent bigger problems from happening. Remember to inspect from top to bottom and do not ignore the small signs of a bigger issue. By dealing with issues while they are still small you can keep your home in shape without having to spend a lot of money to do so.
Author Byline:
This article is contributed by Madoline Hatter. Madoline is a freelance writer and blog junkie from ChangeOfAddressForm.com. You can reach her at: m.hatter12@gmail. com.
For many homeowners cleaning the gutters is one of the least appealing household chores. The build-up of rotting leaves and decomposing insects is enough to make even the bravest homeowner a bit queasy. Some of us choose to ignore the clogged up gutter, saying, “it can wait until tomorrow.” But during extreme weather conditions, tomorrow is too late. Did you know that a clogged gutter could cause roof damage, home flooding, and damage to your gutters and home? A gutter protection system is a must-have item for home protection, and should be installed before extreme weather strikes again.
Types of Gutter Guards: Many companies offer gutter protection systems, including gutter guards of various shapes and designs. Gutter guards offer peace of mind and protection from falling debris, gutter clogging leaves, and excessive water flow during extreme weather conditions.
Filter Inserts: Filter inserts typically slide onto existing gutters. They are designed to keep leaves and debris out, while letting water flow into the gutter. Leaves are supposed to slide off of the filters or dry up and blow away; however, it is a good idea to check filter inserts before extreme weather. A quick check will allow you to remove any debris that has collected.
Screens: Gutter screens are sturdily constructed to protect your gutters from leaves and debris. Unlike the filter inserts, gutter screens typically have hinges that attach to the gutters. The hinges make for easy lifting and cleaning. Prior to extreme weather, gutter screens need to be checked for stuck debris. Sometimes leaves can clog up the screens holes, which will prevent water from flowing into the gutter.
Service Tension Unit (hood): Gutter hoods allow water to follow the hood straight into the gutter. The direct flow of the water pushes leaves off of the roof, while keeping them out of your gutter. Smaller debris (such as pine needles) can still gather in gutters. It is best to check hood installation and gutters before a storm.
Hybrid/Combination: A hybrid or combination gutter guard merges two gutter protection systems into one. This system is designed to maximize the benefits of two gutter guards, while maintaining a low-profile design. Hybrid or combination gutter guards are meant to be effective but not visually distracting from your home’s décor.
Installing Gutter Guards: Whether you choose to hire workers or do it yourself, installing gutter guards is a fairly easy process when you follow these steps.
Check current gutters: Test your gutters by using a garden hose to check water flow. Note where water isn’t flowing properly, and check for gutter damage.
Clean current gutters: Remove any clogged debris from the gutters. Be sure to wear a pair of gloves; you never know what might be living in a clogged gutter.
Measure gutters: Depending on the type of gutter guard that you choose, you will want to make sure that you purchase the correct length. Gutter guards come in various sizes, as such, you might need a saw or metal cutters to cut the gutter guard down to the appropriate size. Gutter guards should be the exact length of your gutters, so be sure to measure correctly!
Installation: Filter inserts and screens fit directly into your existing gutter and should slide or clip easily into place. A service tension unit or combination gutter protection system will require nails, screws, or pop rivets to hold it in place. Check your toolbox before purchasing this type of gutter guard, and be sure to properly align the gutter guards with your gutters.
Enjoy gutter guard protection during extreme weather: Your home and gutters will thank you for installing gutter guards!
Author bio: Suzan Hall is a part time blogger. She covers various topic related to home, interior decoration, and home repair etc. She loves to spend her time with family, friends and enjoys sharing tips and advises online. Over the last two years, Suzan has been blogging and contributing for home improvement and gutter protection systems.