Timber sheds generally look more appealing to the eye than metallic alternatives, but one of the downsides of timber is the large degree of maintenance that it requires.
The durability of a timber shed depends not just on the material, but also on the degree to which you maintain it over time. If you treat it at least once every year, there’s a very good chance that the shed will last for a decade or more and will represent an excellent long-term investment. If you neglect to care for it, though, it could decay rather quickly, especially if weather conditions are often harsh where you live.
The most crucial aspect to good shed care is to treat it annually, ideally with a shed preserver or exterior wood oil. Once that is done, check to see how well (or if) the windows are sealed. If you notice dampness around a window, it’s vital to get it sealed as a matter of urgency. You also need to ensure that there isn’t anything touching off the shed which could diminish its quality – leaves from overhanging trees could transmit a lot of dampness on the structure. If you wish to paint the shed in the color of your choice, the coat of paint will also help to protect the timber whole giving your shed a distinctive, personalized look.
The guys at Crowe Sawmills in Ireland produced an infographic on how to care for a timber shed, going through the steps required and including some useful tips. With winter on its way, now is the time to treat your timber if you haven’t done so already.
A solidly built basement sounds like a perfect choice for a DIY enthusiast’s workshop. The space is already there, the temperature is usually mild, just a few degrees lower than in the rooms above, utilities’ junctions and outlets are readily available, and the whole area is probably accessible from both indoors and outdoors. Still, in order to start moving your tools and machines down, there are several considerations to take into account. Once you clear out these, your basement can become an enjoyable space for your projects.
Prepare the basement
Before your workshop can take its shape, it’s essential that the whole area is dry, accessible and that it meets local building codes. When it comes to basements, waterproofing can be a challenging project, especially if you live in an area with a high water table or a region prone to flooding. Even if neither is the case, basement air is often moist from the surrounding earth and lower temperature. Further on, some building codes also require a fire egress or emergency exit if a basement is to be used as a workshop. It might be a large accessible window or a door with an accessible hallway and stairs.
Provide electricity and lighting
Not many basements are projected as spaces with plenty of light and sufficient outlets, which is something to be considered. All the electrical outlets that your electrician installs need to be grounded and wired on 20-amp circuits, with some building codes requiring Ground Fault Circuit Interrupters (GFCIs) for every outlet installed in a basement. Not to mention that large, power-hungry machine tools such as table saws and lathes need their own separate circuits. While overhead fluorescent or LED lights provide general lighting, consider additional clip-on work lamps for task lighting.
Bring in the machines
Although your workshop will constantly grow as your skills as an amateur handyman develop, there are some essentials that no workroom can go without. As a great complement to an ordinary circular saw, a cordless variation is handier and easier to use in tight spaces or awkward situations, just like a cordless drill. However, a drill press is indispensable for its precise and even action. Fitted with a proper measuring stop, your circular table saw can turn into a high-productivity workstation ideal for extensive house projects which require a large number of identical or precisely cut pieces.
Set up the workbench
Although hardware stores and home centres sell a range of workbenches, you can probably build one of your own, of equal or even better quality, and for less than what you’d pay for a ready-made one. There are roughly three types of workbenches: the traditional cabinetmaker’s bench, the utility workbench and the metalworking bench. Traditional benches have thick hardwood tops and sturdy wooden legs. They have a freestanding configuration, so you can place them wherever it suits you, and work around all four sides. The extra thick worktop made of hard maple or beech laminated blank absorbs the vibrations, while the added weight keeps the bench more stable.
Air quality and ventilation
Sawdust and fumes from paints, stains and varnishes can deteriorate the air quality in your basement workshop. Not only is contaminated air unpleasant to breathe but also highly fatiguing and unhealthy. Portable fans are a great solution for moving the air towards the door and windows while you’re sanding, sawing or applying a coat of varnish. By placing a fan in a window or doorway opposite another open window, you will create a cross breeze that removes the dust and fumes.
It’s not a rare case that a home’s basement serves as a makeshift storage of items that are better given away or stored properly elsewhere. In a few essential steps, your basement can take a turn toward becoming an ultimate DIY workshop and a breeding ground for your future projects.
If you are worried about using man-made chemicals in your home to eliminate or deter pests, then you should know that there are ways to keep your home pest-free without dangerous chemicals.
Plant Certain Types of Plants Outside Your Home
You can plant flowers, herbs and shrubs that will repel pests outside your home. Place these plants in flowerpots on the porch, or you can plant the seedlings directly into the soil. Some of the plants that you can use include petunias, basil, garlic, mint and marigolds.
Use Ultrasonic Devices Inside Your Home
There are affordable ultrasonic devices that you can use in your home to deter pests. You can’t hear the sounds from one of these devices, but the insects, rodents or spiders are annoyed by the noise. Many of these devices are designed for plugging into an electrical outlet, so you don’t need any specialized wiring for the equipment. An alternative to traps that kill pests or fill your home with unwanted chemicals is a catch and release trap with good old fashioned peanut butter.
Application of Essential Oils for Pests
You can find high-quality essential oils at local or online stores, and some of these products will deter pests. You can mix essential oils with water in a spray bottle to apply to windowsills or baseboards, but you can also add essential oils to homemade cleaning solutions. Some of the best essential oil fragrances to use include eucalyptus, lavender or peppermint.
Have Family Pets to Deter Pests
Pests such as mice, rats or wildlife animals will often avoid entering a home where there are family pets such as cats and dogs. You can train your family pets to detect invasions of rodents, and some cats or dogs will also alert you when insects or spiders are in a room.
Repair Your Home’s Garage Door
If your home’s garage door isn’t closing completely or if it has gaps around the edges, then pests such as mice, insects and spiders can invade a building. Many people need to replace their entire garage door. You may be able to have it repaired by a technician who specializes in garage door repair, like those at R & S Garage Door Inc. When you fix or replace your garage door you will keep pests from entering and spreading disease. Keeping pests out of your garage can prevent infestations into the other areas of your home.
Inspect Your Home Frequently
In addition to all of these natural pest deterrent methods, you should keep your home clean and free of clutter. While you are vacuuming, mopping or dusting your home, make sure to inspect for any evidence of pests such as cobwebs, droppings or tufts of fur.
Given that you spend a lot of time at home, it only makes sense that your home should reflect your unique personality. To be sure, things like pictures, mementos, and other personal touches go a long way toward this goal. However, if you really want to give your home that “extra special something,” you certainly have more than a few options. In order to find the best “extra” for your home, it’s important to understand the needs and interests of your family and unique desires. Here are a few unique extras that you might choose to set your home apart from the rest.
Chef’s Kitchen
The kitchen is one of, if not the most important room in the home, even if you prefer to eat out. However, if someone in your family is passionate about cooking, that makes a nice kitchen in your home even more of a necessity. Upscale countertops such as marble, quartz, or granite; high-end appliances such as a six-burner stove, double oven, or smart refrigerator; as well as high-end finishes throughout will truly help to set your kitchen apart. In addition to these creature comforts for the food lover in your household, having large areas for others to congregate in the kitchen can truly help make it a welcoming meeting place, earning its title “the heart of the home.”
Pool or Spa
If you enjoy getting outside to exercise or just to spend your downtime, there’s no better way to do these things than to put in a pool or spa. If you want every day to feel like a vacation, you can utilize elements such as a stone pool and a natural-looking waterfall, or a fun waterslide to truly give your pool that “resort” feel. Spas or hot tubs are also great options. The winter weather doesn’t have to keep you inside. A hot soak can encourage conversation as well as pain relief during the coldest seasons. These features will help your home be the place everyone wants to spend their time, no matter the temperature.
Home Theater
There are few things more relaxing than enjoying a movie with family and friends. How much more relaxing, then, could your movie-watching experience be if you were able to enjoy it in a customized home theater? A dedicate room to your favorite pastime is a great way to reflect your family’s fun and laid-back personality while providing a true escape from the rest of the world. Add a popcorn machine, comfy chairs, and a small refrigerator, and it’s likely you’ll never want to leave. Another great thing about home theaters is that they can be installed in a wide variety of room sizes. If you’re looking at a new home, you can talk to your real estate agent or local contractor to get advice on specific rooms that would work well for this purpose before investing in the property.
What’s inherent in each of these home “extras” is that they’re best enjoyed with a group of people. These extras, enjoyed with the ones you care about, will truly help your house feel like a home and the place that you go to escape from the stress of your busy life.
Many people think that a handyman uses a hammer and screwdriver, and that is about it. You know that’s not true. There are so many more tools that you need to get the average job done. This is even an area where technology is becoming more and more handy as the years go by. As you consider all that it takes to get a repair job done correctly and efficiently, technological tools go a long way towards making that happen. If you are a handyman, here are a few tools that you might want to consider adding to your digital tool belt.
Laser Stud Finders
Every handyman knows the importance of finding strong support beams within the foundation before beginning a big job. This used to involve quite a bit of trial and error before locating just the right spot. If you do not already have a laser stud finder in your tool belt, it is time to put one there. This simple tool will allow you to quickly find the studs that you need to get the job done right the first time.
Electronic Levelers
It is important to make sure everything in a building is level. Your naked eye will only help you in this area to a certain extent. There should not be any guesswork involved here, as the results will be noticeable only after the job is complete. To avoid an embarrassing situation, make sure you are using an electronic leveler. Not only will this save time, it is 100 percent accurate.
Billing Software
The days of writing out receipts and recording income on paper should be over. You want to make sure your time and materials are accounted for, and that you are adequately compensated. To do this, you want to be using roofing contractor software, as this will help you to automate the entire process. You’ll be able to focus on getting more jobs while someone else worries about insurance and getting you paid.
Virtual Assistant
Many handymen are one person operations. You need a way to interact with clients when you are on the job, as you can’t always be in your office to answer the phone or email. There is where a virtual assistant can come in quite handy for you. They are surprisingly inexpensive given the services that they provide.
If you will use these four tools, you should find that your productivity and revenue increases as a result. It is important to remember the skills that have brought you to this point in your profession, but also to use technology as a way to make your life even easier. If you do this, you will find that you have much more time on your hands to enjoy the simple things in life.
Any interior designer would agree that epoxy floors are in vogue for luxury dwellings. They’re affordable, easy to maintain, and durable. At the same time, they give off an elegant finish and are fashionable given the right colors. Yet, just because they are trendy does not necessarily imply that they are the right material for your home. The decision varies depending on your needs. Here are 5 questions you need to ask before agreeing to having epoxy floors.
Where should I use epoxy floors?
The part of the house does matter because epoxy floors tend to get slippery over time, especially the oil-covered ones. Often, this floor type is used in garage or carpeted rooms where liquid spills are not commonly occurring. Otherwise, accidents can happen which can be debilitating or fatal because of the floor’s hardness.
Relatedly, one can ask: Are there children or aged people living at home? As always, safety first before fashion or convenience.
How long should I use epoxy floors?
Generally speaking, an epoxy flooring is a layer of epoxy (a combination of resin and hardener) applied on a concrete surface, averaging 2 mm in depth. Others use the terms epoxy coating and epoxy flooring interchangeably and the reason for the confusion is the thin line of difference of the depth of coating.
So to speak, epoxy flooring is only a top-up and thus it is not ideal for long-term use. It can crack and eventually be scratched to deterioration in a shorter span of time compared to other flooring material such as concrete or steel. Add to that, moisture affects the durability of epoxy floors, thus if you are thinking of long-term use, you may consider other options. There are those who believe that epoxy flooring can last a long time depending on the epoxy type, installation, and care.
What is my budget?
High-end homes are still subject to budgeting. If your goal is to constantly replace and redesign your flooring every 5 years or so, then epoxy flooring might sit well with your taste and budget. Typically, the cost for professional installation is about $3 to $12 per sqm. If you have a 300 sqm area, more likely you will incur $900 to $3,600. Then again, the life span is relatively shorter.
What is my timeline?
Applying epoxy is a laborious task. It cannot be rushed, lest the quality of your flooring will be compromised. Factoring in the design and customization, it will cure for about a week. On an average, about 2 to 3 days (or maybe 5) if required before the coating is completely cured and the offensive smell gone. This is of course given that your concrete floors are already installed. Longer days are needed for thicker coating and completely creating floors from scratch.
Will I have the time to maintain it?
One critical factor in selecting flooring material is maintenance. Fortunately, epoxy flooring is one of the easiest to maintain, possibly next to concrete floors. Dirt and liquid spills slide off easily without the need for scrubbing. For luxury condos, this enables your housekeepers to save time and effort, particularly when the area is too big.
There can be more than just 5 questions to consider and so the best thing to do is to research about the pros and cons and ask reliable home-builders. Better yet, consult friends who have had epoxy flooring for their luxury homes.
We’re all looking for a little luck in our lives, whether we have rituals or routines we follow in order to bring some good fortune into our days, or if we just leave the wishes to birthdays and special moments – most people follow one superstition or another.
If you’re looking for some more luck in your life, then beginning with the place that you spend the most time is the best start.
Terry’s Fabrics have travelled across the globe to provide you with the ultimate list of ways you can bring luck, fortune, and good health into your home. If you add all 7, who knows what luck you might have.
The Bedroom
Use A Dreamcatcher To Bring Good Dreams
Dreamcatchers are believed to gather good dreams and remove bad dreams. Originating from Native America, the string web resembles a spider, as these are an original symbol of protection. When a dreamcatcher is hung above a bed, good dreams pass through and slide down the feathers onto the sleeper below. By adding one of these into your home, you could bring good energy into your life whilst you sleep.
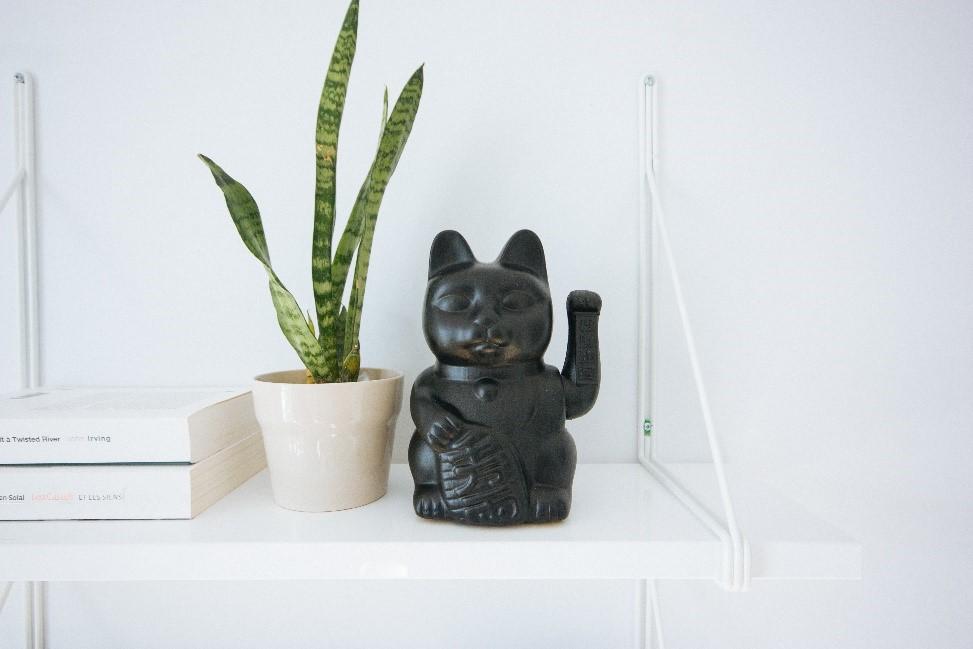
Place a Maneki- Neko in the Bedroom for Good Fortune
This talisman is very popular in Japan – where it originated. No doubt you have seen this cute cat in your local Chinatown, often displayed at the entrance of shops and restaurants. It is believed to bring good fortune especially if placed in bedrooms and places of study.
Living Spaces
Place Bamboo In The East Of Your House For Good Health
Bamboo is a popular symbol of feng shui, believed to bring an abundance of good energy and luck. The plant teaches you how to be flexible and open on the inside so good energy can flow. According to feng shui it’s best to place bamboo in the east or south-east parts of your house, to bring good fortune and health.
Use Pysanka To Protect Your Home
These beautifully painted eggs are considered so powerful in Ukraine that they can protect households and bring tremendous amounts of luck. What type of luck and power you receive from the pysanka depends on the colour and designs, such as a moon on the egg is believed to always shed light on a household.
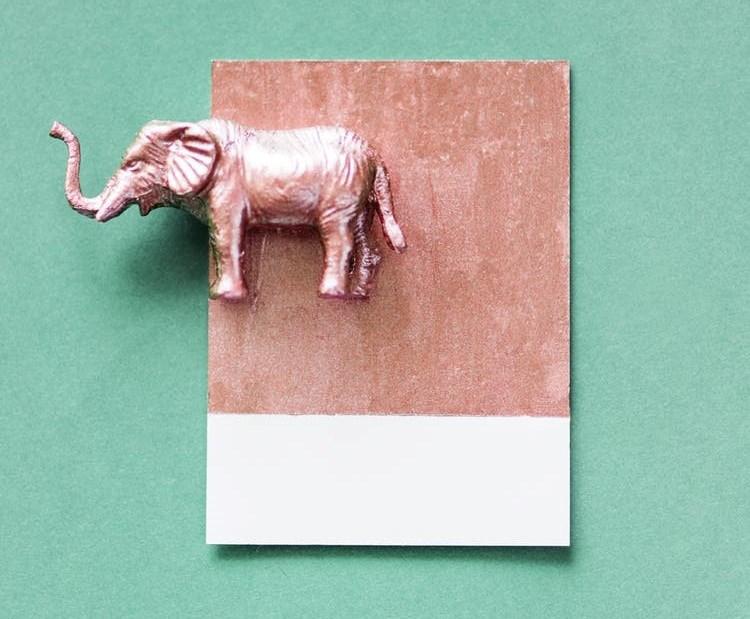
Shower Passer-By’s With Good Luck with Elephant Decor
When placed near doors or windows, elephant decors are said to protect the home from bad luck and if the trunk of the elephant is up it showers passer-by’s with luck.In many cultures, but especially Southeast Asia, the elephant is regarded as a sacred animal. Symbolizing strength, longevity and wisdom.
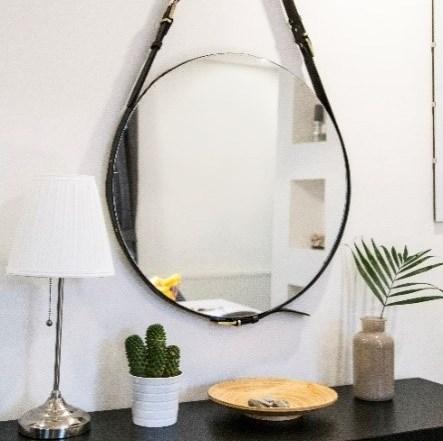
Mirrors Opposite A Beautiful View Will Bring Good Energy
Mirrors are often found in our homes, but did you know they are a bringer of good energy and luck? In feng shui, mirrors are believed to bring light and energy into any space. If you place a mirror where it will reflect a beautiful view this is said to fill your home with positivity and good energy.
Your front door
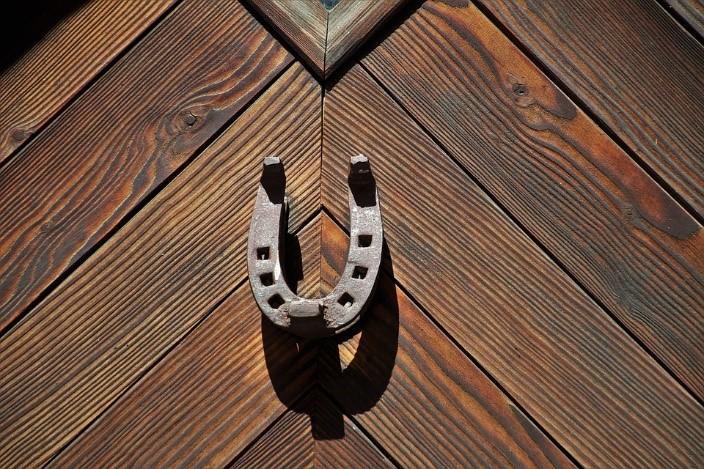
Protect Your House With A Horseshoe Outside
The tradition of hanging a horseshoe on your door dates back to the 10th Century. It stems from the fact they were often made of iron which was believed to be a lucky material, and they were usually held in place with seven nails, seven being a lucky number. This practice received a further boost when Saint Dunstan removed a horseshoe from the devil if he promised not to enter a home with a horseshoe hanging outside.
No matter how early you start preparing for a move, or how much you force yourself to think positively about the entire undertaking, moving is a demanding, stressful task. You never know what might go awry during the preparation and the packing stages, or what might happen at the new place, the minute you unload the truck.
From poorly connected utilities to inadvertently leaving some essential belongings at the old place, all the way to completely forgetting to notify key people of your move – this is not a challenge to be taken lightly. Here’s what you shouldn’t forget to do.
Obtaining the right packing materials
Moving your belongings safely across town, or even country borders, requires proper packing. However, this does not mean simply procuring some boxes and hoping everything will fit, instead, there are a couple of factors you should take into consideration.
First, understand that different items should be packed according to their size and fragility. For instance, while a TV set requires its own high-durability box, clothes and accessories can be put in the same, lightweight container. But that’s not all there is to it, as you want to get the right packing materials in order to ensure the safety of every item during transit.
Labeling boxes properly and per room
Many homeowners leave the task of labeling their boxes for later, oftentimes forgetting to do it until the movers have already begun loading the boxes into the truck. To prevent complete chaos and disarray at the new place, consider labeling your boxes as soon as you start packing up each room. Make sure to label the contents and emphasize the room these should go in so that the movers can have an easier time unloading the truck.
Moving all utilities to the new place
One of the biggest problems that homeowners face when moving is organizing the move of all of their utilities. Oftentimes, people will forget about this crucial task altogether, only realizing their mistake when their gas appliances don’t work because the new place has an electrical network.
To avoid this costly and time-consuming problem, make dealing with moving house utilities your no.1 priority from the get go. You can find reputable companies that specialize in utility connections and can help you plan your move down to the smallest of appliances and utilities such as internet, phone, TV, and more.
Packing the right things at the right time
When planning a move, there needs to be order and strategy to the entire project. You can’t simply pack up your house as you go along, you need to have a system that will help you preserve the peace in the household and make packing a breeze. So, instead of winging it, be sure to schedule packing days per room – starting with the least-used areas and packing the high-traffic rooms such as the kitchen prior to the move itself.
Creating an “essentials box”
There are boxes that should go at the back of the truck, and there is a box that should stay at your side at all times. This “essentials” box is where you’re going to put all of your daily and night-time necessities that you might need prior, during, and right after the move before you unpack. To know exactly what to put in this box, divide items into categories such as hygiene, clothing, gadgets, and essential kitchen accessories.
One final walk-through of the old place
Last but not least, you shouldn’t leave the key in the front door until you’ve conducted one final inspection of the interior. This doesn’t mean giving every room a passing glance on your way to the front door, but rather it means examining every nook and cranny for items that you might have missed. Usually, these will be the items right in front of you, such as a wall clock or a picture frame on the commode.
Moving is a cumbersome task that requires proper planning and preparation, and by no means is it a stress-free chore. Nevertheless, you can alleviate some of the pressure off the entire ordeal by knowing that these essential steps are covered.
Tiles are a great aesthetic addition to any outdoor area, such as the front porch, the walkway leading to the garage or the house, or the entire backyard patio, seating area, and beyond. Depending on the material, tiles are durable, versatile, they come in various colours and shapes, and they can serve a household for years if not decades.
However, in order to achieve this synergy of aesthetics and functionality, there is a need to adhere to proper upkeep and maintenance on a regular basis. Much like anything in your home, if it is to preserve its aesthetic appeal, it requires a regular scrub-and-clean. So, let’s take a look at how you can care for your outdoor tiles with ease for maximum bling and long-lasting durability.
Cleaning and caring for wooden tiles
Let’s start with the most fragile material out there, the wooden tile. Wooden tiles are beautiful, there is no doubt about that, but in order to retain their shine and vibrancy, they do require proper maintenance. You can start by sweeping wood or composite tiles three to four times a week with a soft bristle broom to keep dust and debris off the surface.
The next step would be to wash the tiles once a month with a mixture of lukewarm water and a few drops of mild dish soap. Be sure to use a soft mop for this purpose, stroking the surface in overlapping circles until it is free of dirt. Don’t forget to rinse the tiles with clean water afterwards.
While monthly cleaning is required, you also want to clean any grease stains as soon as you notice them in order to avoid caked stains that can be extremely difficult to eliminate. A good upkeep idea is to deep clean your tiles twice a year with a proprietary cleaner – make sure it has sodium hypochlorite, which will help prevent mould and mildew. Lastly, avoid using abrasive cleaners at all costs.
Cleaning and caring for concrete tiles
Concrete tiles are one of the most versatile and aesthetic features in any outdoor space, as they come in a variety of colours, finishes, and designs that can enrich the outdoor area of your home. Some of the most common types in an outdoor setting include granite, slate, marble, sandstone, and limestone.
Before you get into stuck in with the cleaning and proper annual care, you should consider tile sealing as a great preventative measure for all upkeep hardships down the road. Applying a concrete sealer to your tiles is a good way to prevent damage to the surface, and make cleaning a breeze. A good sealer will also safeguard the aesthetics of the tiles from continuous sun exposure.
As far as maintenance goes, you can start by cleaning the surface with a dry mop every two days to prevent sand and grit accumulation. After that, you can use a mixture of lukewarm water and mild dish soap to thoroughly clean the surface, once every month or so. You do want to be careful with concrete, though, and mop the tiles in concentric circles in order to prevent streaking.
You can also use a bleach solution if there is a need to eliminate algae or moss accumulation. Don’t forget to rinse the surface thoroughly with clean water. As with wooden tiles, abrasive cleaning agents should be avoided at all costs.
Cleaning and caring for porcelain tiles
When it comes to cleaning and caring for porcelain tiles, it’s best to sweep the surface daily using a soft bristle brush. You can also use the adequate vacuum attachment to expedite the process. It’s important to do this regularly in order to prevent hard stains.
The next step is to clean the tiles with warm, clean water on a weekly basis. There is no need to use soap for this type of surface, as regular cleaning is sufficient to eliminate dirt and grime. Instead of leaving the tiles to dry naturally, be sure to sweep the surface with a dry cloth to avoid moisture-related problems down the road.
Once a month, you can schedule a thorough cleaning session to restore the surface to its natural beauty and shine. Mix clean, lukewarm water and 1⁄4 cup (about 60ml) of white vinegar in a bucket, dip the mop into the solution and proceed to mop the surface in circles in order to loosen those hard stains. After that, you want to rinse the surface with clean water and dry it thoroughly. Be sure to avoid abrasive cleaners here as well.
Tile maintenance, no matter the material, needn’t be a cumbersome chore. Rather, it should be a quick, and pain-free task that will restore the beauty of your outdoor tiles, and help them preserve their look and structural integrity throughout the years.
Dead trees are more than just an eyesore on your property. They also pose certain hazards that could jeopardize your home and yard. Here are three ways that dead trees can be especially dangerous for your property.
Personal and Property Damage
The branches of dead trees are at greater risk of snapping and falling at any given time. When these branches fall, they could land on you and result in serious bodily harm. Branches that fall from dead trees might also land on your roof or fence and cause major property damage. The entire tree could also topple if it’s dead and cause more extensive destruction. If any dead trees or branches fall into your neighbor’s yard, you’ll likely be liable for any damage. Parts of dead trees are especially more prone to collapsing during heavy rain, wind and snow storms.
Harmful to Other Trees
If you have a tree that died from a disease, this disease may still be active and wind up affecting nearby trees that are still alive. Contagious diseases can spread from a dead tree to a living tree easier than you might think and end up killing your existing vegetation. Fungal growth on a dead tree is another culprit that could be dangerous for adjacent trees. Plus, a dead tree can overcrowd your yard and make it more difficult for other trees and vegetation to grow healthy. To avoid harm to your other trees, you should hire professional arborists from a company like Pete & Ron’s Tree Service, Inc. to remove any dead trees on your property.
More Pests
Certain types of animals that are known to wreak havoc on properties might end up building a home in a dead tree. Living trees can also attract more pests, but at least trees that are still alive can produce more oxygen and help keep soil intact. Dead trees serve no real purpose and can be a haven for wild animals, so it’s best to have them removed promptly. Critters living in these trees will have easier access to your home. According to Angie’s List, some of the pests that you might encounter from having dead trees include rats and termites. Your dead trees can also provide a haven for black turpentine beetles, fall webworms and gypsy moths.
Having dead trees on your property can cause many problems. By getting rid of your dead trees, you’ll have an easier time keeping your premises intact with fewer problems.