fbpx ...

Smart spending tips for spring home improvements

Tips to help you save on Spring home improvement projects:

home improvement tipsSpring home improvement season is on the way, and if you’re like most homeowners you have a list of jobs you want to accomplish. Some will be small, economical do-it-yourself projects. Others may require the services of a professional and a greater monetary investment. However you accomplish your home improvement plans, it’s important to do so as cost-effectively as possible.

To make the most of your home improvement projects this spring, take these five steps:

1. Define what you want to do. Be precise and detailed in exactly what you want to accomplish. Going into a home improvement project without a clear vision of the end result means you’ll be making decisions on the fly – and that’s the type of decision-making that can become costly. Knowing exactly what the scope of your project will be can help you better estimate the costs and stay on track with your budget and objectives.

2. Decide if you can do it yourself or need to hire a pro. Yes, DIY can save you dough, but only if you can do the job right the first time. Fixing mistakes can cost more in the long run than hiring a professional. Be honest with yourself about your DIY capabilities, and if a project is beyond your scope, look for a pro to help.

3. Make sure you’re hiring a reputable contractor. While the majority of home improvement contractors are honorable and just trying to earn an honest living, there are also less reliable ones out there, too. Doing business only with companies or contractors who are licensed and bonded can help you weed out the scam artists. Always seek independent reviews of any contractor you may hire. Don’t just rely on the references he or she provides.

4. Create a budget for your project, communicate it to your contractor and make sure he or she understands you’re committed to staying on budget. Good contractors know how to balance quality concerns and cost constraints and will work with you to avoid cost overruns. Your budget should lay out how much you will spend on materials and labor, with some “wiggle room” left over to cover emergencies or necessary changes.

5. Check your credit. It would be great to pay cash for everything your home needs, but it’s not always possible. It’s likely you’ll need to fund larger projects with credit, so it’s important to understand your credit status before you apply for any kind of loan or line of credit. Knowing your credit score and what’s on your credit report can help you better understand the likelihood of you getting the loan you need and what terms you might expect to get on a loan.

Spring is a great time to make improvements that will increase your home’s resale value and your enjoyment of your home. It’s important to make wise decisions about how you’ll manage and fund your home improvement projects, so that when the work is done, you’re left with a better home – and as little debt as possible.

Contact us at 914-576-2572 to schedule your free in home estimate.  We’ll make sure we work within your budget while providing the best quality craftsmanship!


Siding with style adds timeless value

Siding with style adds timeless valueAs cooler temperatures approach, more homeowners are turning to value-driven renovation projects that will warm up their space and withstand the test of time.

Replacing outdoor siding is the home improvement site’s No. 1 pick for projects that add value to your home, according to HGTV.com. Siding that is in bad shape gives an immediate impression a home is a “fixer-upper,” which can hurt expectations by potential buyers before they even step inside. Refreshing your outdoor siding not only adds curb appeal but overall home value. –

For Chicago-based architect Dirk Danker, principal at Nagle Hartray Architecture, one of the most popular siding applications on a single-family home is wood. Its timeless versatility as a total siding strategy or use as an accent that sharpens up the front of a home makes it a smart, durable choice in any climate.

“We like it for its natural color, longevity and workability,” says Danker. “Many of these houses are vacation homes where the desire is to provide as maintenance-free a structure as possible, and wood siding meets that requirement.”

A side of style

In addition to using materials that are easy to install, homeowners tend to choose traditionally popular materials to maintain a home’s appeal through years of evolving trends. The stylish texture and rustic-colored warmth of Western Red Cedar siding gives any home a natural beauty while enhancing front yard curb appeal.

Replacing the siding on a home may seem daunting, but it can be done strategically to maximize value and accommodate all budgets. Creating an accent wall or using wood as a complement that warms up other materials can make a project more affordable while still boosting the bottom line.

Wood siding comes in many different patterns and grades, such as bevel, board and batten, channel, and tongue and groove, to match a home’s style and budget. Stains and other finishes will help preserve the wood and keep it looking nice for years to come. Pre-finishing siding onsite before it is installed is recommended.

Timeless taste

If you are not quite ready to take the plunge on a siding project, consider adding trim in earthy red, golden and clay tones for a timeless touch to your home’s outdoor frame. Posts, beams and gables can also help reinvigorate a home’s exterior.

Regain investment

Because siding replacement projects tend to include durable, low-maintenance materials, they typically recoup between 69 and 78 percent of their initial costs, according to Remodeling magazine’s latest “Cost vs. Value Report.” That return on investment is important whether you are refreshing your home to stay or planning to sell.

A home’s exterior finish makes the first impression and sets the tone for the rest of the house. Siding that is warm and inviting defines a mood and character that has long-term appeal to guests and potential buyers.

We specialize in installing all different types of siding.  Vinyl siding is probably the most popular in our area.  Having said that, lots of folks still like the rustic look of wood siding and we’re happy to consult with you to help you determine the best option for your home!

*Limited time offer:  10% off our labor costs now through December 25, 2012.  (new customers only)

Button-up your home for winter

time to prepare your home for winterAs the leaves turn and fall to the ground, it’s time to start thinking about “buttoning up” your home for winter to keep you and your family healthy and comfortable, your belongings safe and high energy costs at bay.

Heating accounts for 34 percent of all annual utility usage, according the U.S. Environmental Protection Agency (EPA). One of the most cost-effective ways to improve the energy efficiency and comfort of your home is to seal and insulate the “envelope” – outer walls, windows, doors and roof. By doing so, ENERGY STAR estimates that a homeowner can save up to 20 percent on heating and cooling costs, the equivalent to lowering up to 10 percent of total energy costs for the year.

Here are a few ways to keep you and your family healthy, your belongings safe and help lower your heating bill:

Preventing the draft

Old, drafty windows and doors can account for home energy loss of up to 30 percent, according to the EPA, which means paying more in the winter to heat your home. By replacing non-performing windows and doors, homeowners can drastically reduce heating costs. A typical home that replaces its single-paned, clear glass windows with energy-efficient windows can realize up to $501 in annual savings, according to the EPA.

Additionally, old or improperly installed siding can also be the cause of drafts. However, by installing new, energy-efficient vinyl siding and underlayment, homeowners can increase a homes’ R-Value, a measure of insulation’s ability to resist heat traveling through it.

However, even the best windows, doors and siding can be drafty, if they are poorly installed. So it’s important to make sure your home improvement is completed by a quality contractor who has a long history of being in the business so you can be sure they will be around if you have any issues down the road.

Prevent moisture

Water leakage from snow, ice and rain can cause damage to the exterior and interior of your home. This can result in costly damage to framing, structure and insulation, more importantly it can cause issues – like mold – that can be harmful to the health of your family.

The roof is often the site of leaks in homes; however, by installing a new roof and taking the proper precautions, leaks won’t be a problem.

Other ways to improve the seal of your home to prevent moisture damage, drafts and improve energy efficiency include:

* Sealing leaks

* Adding insulation

* Sealing ducts

For more energy saving window, door, siding and roof tips, check out the U.S. Department of Energy’s website.

Want to make sure your home is ready for the winter weather?  Give us a call at 914-576-2572 or send us an email to   bruzzesehomeimprovements@gmail.com.  We special in energy efficient window replacement, roofing and energy efficient vinyl siding.

How to remove wallpaper properly

how to remove wallpaper properly
BIO: This is a guest post
on behalf of national tool and equipment hire supplier HSS Hire who specialize in DIY equipment including Wallpaper strippers.

Doing your own decorating is a great way to save money and can be a good household bonding experience too. But unless you do it right you can make mistakes that are expensive to correct, and create more discord than harmony.

It is probable that one of your first steps will be to strip away existing wallpaper. Although some choose just to paper over it, this is usually a bad idea, because new coverings stick less well to old wallpaper than to the basic wall surface.

Preparation is the key!
Don’t neglect to cover up the carpet and anything else in need of protection, and tape your covers in place. You should also cut off the electricity to the room, and tape covers over all electrical outlets. Gather together all the equipment you’ll need before you begin.

Check what your wall is made out of
Most walls are either ‘drywall’ (this is made out of a soft kind of plaster called gypsum sandwiched between paper layers) or plaster that has been laid over a wooden or metal mesh. You can tell by feel which one you have. Plaster feels cooler to the touch, and is smoother and harder. If in doubt, try tapping it. Drywall sounds more hollow.

You need to be particularly careful when stripping wallpaper off drywall, because as the name suggests, it is particularly susceptible to water damage.

Check what kind of wallpaper you’re dealing with
Some more modern wallpapers are dry-strippable. These are much easier to deal with. To see whether this applies to yours, get a putty knife and carefully ease off one corner. If it peels then you’re dealing with dry-strippable wallpaper. If that’s the case, you shouldn’t need any further tips – just remove the wallpaper carefully from the wall. If not, you’ll have a harder time of it.

Using a stripping solution
This is the traditional method of wallpaper removal, and perhaps the messiest and most time-consuming, though the good news is that it doesn’t require any expensive special equipment.

First either score or sand your wallpaper to help the water soak through, then fill a bucket with very hot water and stripping solution – there are lots of alternatives for this including vinegar and unscented fabric softener as well as products sold specifically for the purpose of wallpaper stripping.

Use a sponge, roller or large brush to soak small sections of wallpaper at a time. The key is never to soak more than you can remove in about ten to fifteen minutes. Let it soak for a few minutes then start stripping, using a plastic putty knife. Don’t neglect to wash away the residue once you’re done.

Using a steamer
You can make your life much easier by renting a steamer. The process for removing wallpaper with a steamer is very similar to using a stripping solution, but instead of painting anything on, you just have to hold the steamer against the section you want to remove.

Here is an interesting video about uploaded by Kulppainting about how to remove wallpaper. 

http://www.youtube.com/watch?v=Vb7_lOmdSjQ

BIO: This is a guest post on behalf of national tool and equipment hire supplier HSS Hire who specialize in DIY equipment including Wallpaper strippers.

Image reference: http://www.flickr.com/photos/varresa/1127789331/sizes/m/in/photostream/

Home Renovation: The Various Dangers

Asbestos Photo

Guest post courtesy of:

Brian Turner
Toxic Substance Safety Advocate

Home renovations can be a lot of fun. When a home needs a face-lift  it can be more affordable to use the DIY approach. While there are many advantages to a DIY approach, it’s also important to acknowledge the many dangers. Understanding that there is the potential to stir up asbestos, breath in vapors and even damage eardrums will make it easier to recognize the importance of the proper safety equipment.

Perhaps the most dangerous chemical that can be exposed in home renovation is asbestos. Exposure to asbestos can lead to a cancer known as mesothelioma. The Environmental Protection Agency (EPA) provides information about asbestos and where it can be found and how to avoid it whenever possible. As long as it’s not disturbed it doesn’t pose a threat. However, when it is disturbed in a DIY project, it can expose everyone in the home.

Just as it’s important to wear a dual cartridge respirator when sawing and sanding because of the various fibers, it’s important to do so with dry wall, insulation and anywhere else that asbestos is suspected. There are tests that can be run by professionals to test for the presence of asbestos. This can be a good idea to determine whether it’s best to let professionals handle the renovation or if it is still a good DIY project.

The various respirators can be purchased at any home improvement store. There are cartridges that go into them and they have a finite life span. It’s important to know when the cartridges have to be replaced to ensure they are doing the job they are supposed to.

When it comes to breathing in vapors, such as those of paint thinner, polyurethane and other chemicals, there are precautions to be taken as well. A respirator can be worn but that only protects the lungs. The eyes should also be protected, which means wearing goggles.

Many of the chemicals also warn about the product being a skin irritant. Gloves should be worn as well. There are some gloves that cover more than just the hand and can be advantageous to offer the highest level of protection.

Some home renovation projects include using some very loud equipment. Holding an electric saw, a jack hammer or anything else can cause damage to the eardrums. There are various earplugs and headpieces that can offer ear protection. Each different plug will say how much protection it offers so it’s important to buy the right level.

Accidents happen during DIY projects all the time. It’s critical to stay informed about all the risks before getting started. Reading about asbestos and checking out the MSDS sheets on all chemicals can go a long way in preventing any unnecessary exposure. A DIY project can save a lot of money but if it puts everyone’s health at risk, there wasn’t actually any saving involved. There are ways to protect one’s self against the dangers but it involves knowing what to wear and when. Safety gear was created to be used, so that’s all one has to do.

Guest post courtesy of:

Brian Turner
Toxic Substance Safety Advocate

Brian TurnerBrian Turner has been working with the Mesothelioma Cancer Alliance as an environmental health and toxic substance safety advocate since June of 2007. Brian brings a tremendous amount of research and awareness experience in environmental health risks, environmental carcinogens, and green building expertise. Brian is very interested in all types of cars; his favorites are classic, muscle, and imports. Brian is commonly found playing and watching various sports with his friends.

Stay Connected with Brian Turner

Read more: http://www.mesothelioma.com/blog/authors/brian/bio.htm#ixzz29ZJmnqVM

Kitchen remodel in Hastings, NY

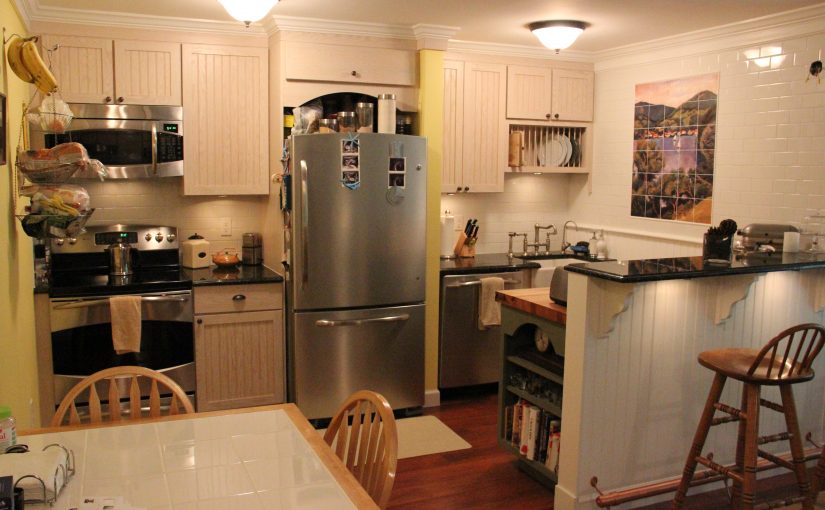
Eric and Cortney Auletta live in a great apartment in Hastings, New York.  Problem was, the kitchen was cramped and needed a make over.  I was delighted that they contacted me for the project!  Eric was kind enough to send me these pictures:

Kitchen remodeling project in Hastings, New York            Kitchen remodeling project, Hastings, New York

Kitchen remodel project, Hastings NY

We love our customers!  If you live in the Lower Westchester area of New York, please contact us to discuss your home improvement/home renovation project.  We’d love to hear from you!

– Gary Bruzzese, Owner, Bruzzese Home Improvements.
914-576-2572

Decorate With Intention: 12 Remodeling Sanity Savers

When the idealistic visions subside and reality sets in, these tips can help keep your spirits up and your work on track

Decorate With Intention: 12 Remodeling Sanity Savers

It’s easy to get excited about a home project at the beginning, when the work seems theoretical and you hear yourself saying things like, “Oh, we could just knock all of these walls out, no problem!” Then reality sets in. The workers you hired go AWOL, your budget is blown and you can’t find your good shoes under the pile of scrap wood and duct tape. It’s time to take a deep breath and make a plan. Read on to find a dozen ways to stay sane while you are creating your dream home, no matter how long it takes.  Read more…

Source:  Houzz, By Laura Gaskill

Big design ideas for small kitchen spaces

renovating small kitchensBigger isn’t always better in the real estate world, and what’s more, it’s not always possible. With more baby boomers downsizing from McMansions to smaller, more manageable houses, and a growing number of people opting to rent rather than buy, many families are looking for new ways to decorate, design and work with smaller spaces.

Kitchens sell homes, but this most-used room in the house hasn’t escaped the “less is more” trend, either. Interior designers, decorators and home product makers are responding to the growing demand for practical, beautiful options that make sense in smaller kitchens.

If you’re looking to make a big impact in a small kitchen, here are a few ideas to get you started:

Work the walls – You may love your cozy kitchen, but that doesn’t mean you want to make it look or feel any smaller than it already is. Lighter wall colors can help a little kitchen feel more open and airy. One winning decorating technique for small kitchens is to paint the majority of the wall space in a light neutral tone, like a pale cream or taupe and then add a pop of brighter or darker color to one accent wall or area. You can edge up the excitement of this technique by using a mural for kitchens on the accent wall, rather than just a different paint color. Have an oddly shaped niche in your kitchen? You can turn that problematic space into a design statement with custom, repositionable wallpaper that can be custom-sized and custom-colored to fit your specifications. This unique product can be adhered and re-ahered hundreds of times so you can take it with you to your next house if you choose.

Smart-size your appliances – Sure that 30-cubic-foot stainless steel refrigerator is beautiful in the showroom, but how much will you love it when you can’t fully open the door in your small kitchen? Refrigerators come in several sizes, so you should be able to find one that will fit your space. The same is true for stoves, microwaves and dishwashers. Choosing appliances that make size-sense for the space you have not only improves the livability of your petite kitchen, it can improve your efficiency as well.

Get creative with storage – One of the biggest challenges of a small kitchen is finding space for everything from pots and pans to flatware, dishes and foodstuffs. Small spaces call for storage creativity. Whether you hang some pots and pans overhead, replace traditional cabinet shelves with pullout drawers or use special racks to store plates vertically, you can find plenty of creative small-kitchen storage solutions.

Liven things up with light – Often, a small kitchen will have just one window – or no window at all. Yet light is an important way to make a tight space feel more expansive and inviting. Task lighting is essential for work areas in small spaces. Pendant lights can create ambiance and provide practical illumination without sacrificing any wall space. And if you crave natural light for your windowless kitchen, consider installing a skylight. Tubular skylights can bring sunlight into your ground-floor kitchen even if there’s a second floor above it.

Small kitchens are here to stay, whether as part of the trend toward smaller, more efficient homes or the reality of rental unit life. With some decorating creativity and practical design tactics, you can ensure your small kitchen yields large benefits – both in terms of enjoyment and resale value.

Bruzzese Home Improvements specializes in kitchen remodeling and kitchen renovation.  Please give us a call at 914-576-2572 or send us an email to  bruzzesehomeimprovements@gmail.com for your free in home design consultation.

Open Walls Widen Home Possibilities

Doing away with the boundary between indoor and outdoor living, open walls add space, light and drama to a home

Open Walls Widen Home Possibilities


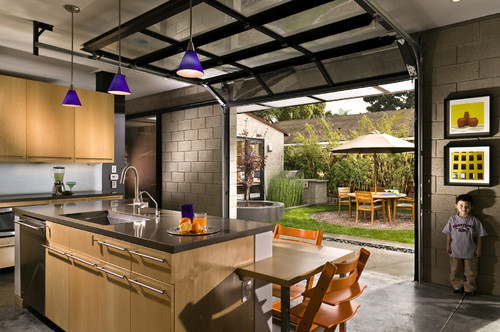
My dream house has an open wall with a door made of glass. It opens to a deck and a pool and some sort of sunny, spectacular view, preferably with the Pacific Ocean in the background.

But, truth be told, I’d settle for a garage door that opens onto my own work-in-progress backyard.

Open walls are the ultimate embodiment of indoor-outdoor living, blurring the lines (well, getting rid of them actually) between the two. They are a fresh-air fanatic’s dream come true, and there is something about them that is just positive and friendly. They are the ultimate invitation.  Read more…

Source:  Samantha Schoech, houzz.com

Call us at 914-576-2572 or send us an email for all your home improvement needs.

Forget Boring Bathrooms

Add Old-World appeal with these custom-designed and fabricated stonework elements.

Forget Boring BathroomsBruce Birkl, owner of Distinctive Granite and Marble loves a challenge: “We say to our customers, if you can draw it, we can fabricate it.

”While buyers entering the 14,000-square-foot Holbrook facility may initially be wowed by the thousands of stone slabs and the state-of-the-art computer-aided fabrication facility, Birkl reminds people that most designs start with a simple sketch. From there, a mock-up is crafted by hand—not machine—and shown to the customer. Then, adjustments are made to determine how the element fits the function of the room.

One room where custom work and materials can really be explored is the bathroom. Because certain areas of most bathrooms see less wear-and-tear than kitchens, some exotic stones can be considered. These include onyx, certain types of marble and limestone, which in general have softer colors than granite.  Read more…

Via Today’s Renovation

Ready to update your bathroom?  Give us a call or send us an email for your free in home design consultation.

Copyright © 2024 | Bruzzese Home Improvements | All Right Reserved | Web Design & Development by QualityMust