
Did you know that you can expect your plaster for walls to last an indefinite period of time before you require maintenance for your walls? Plastering a room is a job that usually gets handled by experts with all of the best plastering equipment. That doesn’t mean that you can’t turn it into a fun DIY project.
You’ll want to make sure that you have some of the plastering tools needed for the job and you’ll want to have some PVA glue and dry plaster on hand. There are also some important steps that you’ll want to take if you’re set on using plaster for walls as a DIY project in your home.
The good news is that you’ve come to the right place to learn more about the wall plastering process and how to start plastering a room. Continue reading this article to learn more.
1. Preparation
The first thing to do when you’re thinking about using plaster for walls is to make sure that you’re prepared. This means making sure that you have all of the plastering tools that you need in order to do the job as well as all of the supplies required to create dry plaster. You should also lay down a dust sheet to catch any debris or plaster that doesn’t end up on the walls.
Another thing to do before you start plastering a room is to make sure that the walls are clean of any dirt or dust. This is important so that the replacement plaster goes on smoothly.
2. Apply PVA Glue
The next step is where your PVA glue enters the picture. You’ll want to start applying the PVA glue to the walls that you’re planning to plaster since the PVA bond will help to ensure that the plaster remains on your wall in an even and smooth fashion. When using your PVA glue you need to make sure that it is mixed at a 1-to-4 ratio with water for the best results, and from there, you’ll use a roll-on brush to coat your walls with PVA glue.
3. Mix Your Plaster for Walls
As soon as you finish applying the PVA glue to your walls you’ll want to get started with mixing the plaster for your home’s walls. It is a wise move to wear a dust mask when you start this process.
You’ll want to mix the plaster with some cold water and whisk it for a decent period of time. You’ll know that it’s finished when it resembles custard. Just remember to mix the plaster into the water rather than mixing water into the plaster.
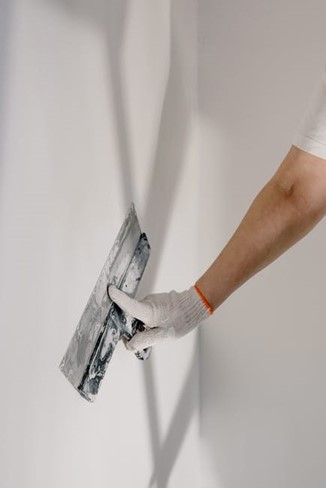
4. Apply the Plaster
Now that your plaster is all mixed up and ready to go you can start applying it to the walls in your home, and you’ll start applying the wet plaster to your walls using a hawk board as well as a trowel and a float. If you don’t get it perfect it isn’t the end of the world. You’ll need to reach out for plaster repair in beaumont.
You’ll start by placing some plaster on the hawk board. Do this by scooping it out of the bucket with your handy trowel. Next, you’ll break out your float and use it to push the plaster onto your walls. Start in the bottom left-hand corner and work your way up the wall.
5. Smooth It Out
Next, you’ll want to start smoothing out the plaster on your wall before it becomes dry plaster. A good approach to take is to wait around 20 minutes after you apply the plaster to the walls in your home. Once the twenty minutes is up you can go through and remove any large chunks while getting rid of unwanted bumps in the wall to get that perfect and smooth plaster look.
It is also a good approach to go smooth out the corners of the wall since those are the most troublesome areas.
6. Apply Another Layer
After you get done smoothing out the first layer you can start with applying the second layer. This second layer is the final coat that you’ll to your home’s wall. This layer should be thinner than the first layer. This means that you’ll need to dilute the plaster you’re using by adding a bit more water to the mixture.
A good rule of thumb is to try to add a layer of plaster that is only two millimeters thick. Then let that second layer dry.
7. Add Finishing Touches
The plaster you’ve added to your walls should be done drying after about thirty minutes. At that point, you’re good to move on to the next step in the process. You’ll want to start by polishing your walls where you’ve added the plaster. The best approach to do this is by spraying the walls with water.
Find the edges and spray them with a bit of water before running your trowel down it. This will create a smooth appearance for your plaster for walls. Another effective option if you don’t have a trowel is to use a wet paintbrush. A wet paintbrush is a great choice for handling the more difficult areas like the corners.
After your plaster for walls dries you should go in with some sandpaper and get rid of any unwanted bumps or extra plaster on your walls.
8. Start Painting or Wallpapering
It is up to you whether you want to paint your plaster for walls or put wallpaper up. Once you’ve concluded adding your finishing touches it is up to you how best to proceed. If you choose to paint make sure that you apply a primer later before adding the paint color of your choice.
Now You’re Ready to Apply Plaster for Walls in Your Home
Using plaster for walls is a great way to create beautiful walls that are durable for the interior of your home. This is a task that tends to get left for the professionals but there is no reason that you can’t learn to use plastering tools and PVA glue on your own. Make sure that you follow these helpful steps and you’ll have perfect, dry plaster in no time.
For more helpful articles on a bunch of topics, check out more of our blog.
More from my site
 Ways to Save on Home Remodeling Costs
 DIY vs. Renovation Contractor
 How To Make Your House A Home For An Elderly Loved One
 Five Home Renovation Projects You Can Tackle This Weekend
 What to Do When Your Remodeling Project is Taking Up Your Whole Life
 Mini Renovation: 4 Small Repairs That Will Make a Difference in Your Home