fbpx ...

4 Quick Plumbing Fixes Anyone Can Master

4 Quick Plumbing Fixes Anyone Can Master

Even though plumbing systems can be relatively complex, there are a few fixes and repairs that everyone should master. Major issues such as cracks in the sewage line will need to be taken care of by a professional, but minor leaks and clogs can easily be fixed with basic tools and a little bit of research. Whether you are renting your first apartment or have just purchased a brand new home, here is a look at some simple repairs you should know how to do.

Dealing with Clogs

If only one of your sinks or showers is clogged, then the debris is most likely not that far down the sewage line. That means you should be able to take care of it with an over-the-counter clog remover. Those who don’t want to use harsh chemicals can also make their own clog remover out of baking soda and vinegar. Homeowners should immediately call a plumber like Knights Plumbing & Drain if multiple sinks, toilets, or showers become clogged at the same time. Deeper clogs can only be broken apart with specialized tools.

Fixing a Leaky Faucet

A single leaky faucet in your home could end up wasting hundreds of gallons of water a month if you don’t take care of it right away. Fixing a leak might seem intimidating, but this job is relatively straightforward as long as you are careful and meticulous. Most leaks can easily be fixed by tightening a handle or replacing an O-ring. Before fixing a leak, you must first shut off the faucet and plug the drain to prevent water damage.

Relighting the Water Heater

One of the most common problems that homeowners run into is the water heater’s pilot light going out. The vast majority of water heaters have a visible valve with a “pilot” position. After turning the valve to that position, you then need to use a lighter with a long neck to relight the flame. Homeowners should never attempt to relight a water heater if they smell gas.

Replacing a Shower Head

Upgrading or replacing an old shower head requires nothing more than an adjustable wrench and some plumber’s tape. The old shower head can be removed by loosening the single connecting nut until the entire shower head comes off. You must then wrap the exposed threads with plumber’s tape to prevent leaks. The final step is to attach the new shower head by turning it clockwise on the threads before tightening the connecting nut.

In order to carry out most plumbing repairs, you are going to need a decent set of tools. At the very least, every homeowner should have a combination wrench set, a plunger, pliers, an adjustable wrench, duct tape, and a caulking gun. These few tools will allow you to take care of minor clogs, slow leaks, and other basic repairs.

Going for Modern? Top Tips to Bring Your Home Into the 21st Century

A cozy home offers a relaxing setting for your family. However, that home might appear to be a bit outdated in regards to the doors, windows, and decorations. There are a few tips that you can use to bring your home into the 21st century so that it’s modern while still keeping the beautiful look and comforting feeling.

Going for Modern Top Tips to Bring Your Home Into the 21st Century

Update the Electrical

Whether it’s the lighting in the home or the outlets, one of the things that you might want to update for the safety of the home is the electrical system. Consider installing a charging station in a central location of the home. The station could feature everything from car chargers that you might need to get while traveling to cords for the laptop. Everyone in the family can charge their devices without anyone losing cords. The lighting is another aspect that you want to look at changing. Install lights that are brighter to offer a glow that you would get from the sun while ensuring that they don’t use a lot of electricity.

Update the Doors

One of the ways that you can make a significant change without spending a lot of money is to change the doors. A bi-fold door, like those from Nu-Look Glass & Aluminum Windows, is ideal for an entryway to a deck or patio. You could also install this kind of door leading from the kitchen to the living room or another section of the house as a way to keep one room completely different from the other. Another simple way to change the doors is to install ones that have an intricate design, like frosted glass with a flower etching.

Make the Home Open

Most older homes are clearly divided into rooms using either walls or counters. Consider removing some of these barriers in the home to create an open space. This will allow for easier travels from one room to another. You’ll be able to see the people who are in the home instead of walking through a door or being separated by a wall, which can make you feel secluded at times.

Change the Flooring

The flooring of the home can make a statement about the overall appearance of the house. If the floor hasn’t been changed in some time, then now might be your opportunity to upgrade your floors so that they are a bit more modern. One of the things that you want to do is remove as much carpet as possible as this is often an outdated look in many homes, replacing it with laminate that looks like hardwood or tile. These materials can make rooms seem larger and are easier to clean.

Your home is where you likely spend a large amount of time during the day. It’s a safe haven for your family. That doesn’t mean that it should stay shrouded in the commonplace designs of the 20th century. Use a few simple tips to update your home so that you want to live there.

Factors To Consider During The Air Conditioning Installation And Maintenance Services

Air conditioning installation and maintenance is a service provided in order to facilitate proper installation of an air conditioner unit. In order to ensure that it provides you the guaranteed improved and quality air with optimal and ideal energy usage. The installation of a unit varies according to the different types of AC units available. Selection of an AC unit depends on different parameters such as the space to be cooled and the total amount of heat generated within the enclosed surface. Based on the above-mentioned criteria, the AC units are classified as:

Air Conditioning

  • Window Air Conditioner
  • Split Air Conditioner
  • Packaged Air Conditioner
  • Central Air Conditioning System

The primary factors to consider during the installation and maintenance services of air-conditioning, which affect the performance of an AC unit, are:

  • Correctly sized
  • Sufficient airflow operation
  • Appropriate amount of refrigerant
  • Tightly sealed ductwork

The proper installation and maintenance service of an air conditioner unit helps you obtain the optimal comfort. There are many firms, who are rich in industrial expertise provide high quality air conditioning installation and maintenance services. The air conditioning installation process comprises of different steps such as:

1. Indoor Unit Location

The positioning of the air conditioner plays a pivot role in its installation and working. The air conditioner front vents shall not be obscured in any way that may cause hindrances in good air circulation.  In addition, an AC unit should be always away from any doorways or any pipes.

2. Outdoor Unit

With regards to outdoor units, there shall be enough of space around it and shall always be installed in a flat and secure surface. If the air conditioning unit installation is done on a roof, it needs to be fastened on a wood to prevent it from being blown by the high wind.

3. Water Drainpipe

In the case of an indoor unit, make sure the water pipe is at the end of the tray and rubber bung is at the hole on opposite side. The drainpipe should be angled at a good distance from the location, as water drainage would be much more during extreme summer.

4. Pipe Connection

While connecting the pipe to the unit, do not over tight them and they need to be covered with a foam insulation to prevent from any refrigerant leaking.

Purpose of Maintenance Service of an Air Conditioner is:

  • Control bacterial growth in cooling water systems.
  • Avoid scaling and corrosion of pipelines that come in contact with the circulating water in an AC unit.
  • Maintain perfectly cleaned and sanitized drain pans to prevent stagnant water.
  • Prevent increased consumption of energy source due to corrosion products and deposits within the compressors.

Furthermore, regular maintenance of an AC unit is important for proper functioning of the unit at its top efficacy. Routine air conditioner maintenance helps to avoid any major breakdowns in the future and perfect functioning throughout the changing seasons to come.

For efficient operation, the unit shall be maintained effectively and efficiently throughout its usage. The negligence of necessary maintenance can cause a steady decline in the performance of the unit with a steady rise in energy consumption. The primary objective of maintenance is to mitigate the consequences of a failure of the unit.

Important Steps in Air Conditioner Maintenance Service are:

Routine cleaning and replacement, if needed, of air conditioner filters, coils, and fins. Clogged filters prevent good airflow. Unclean coils reduce the unit’s ability to absorb heat and the condenser coils bent easily, which needs to be replaced to avoid blocking of airflow.

  1. Clear clogged drain channels – as they prevent the air conditioners from lowering the humidity levels.
  2. Correct checking of the amount of refrigerant.
  3. Checking the thermostat accuracy.
  4. Measuring airflow in the evaporator coils.

Thus, proper care ensures the efficacy of your air conditioner.


Sweltering Heat: How to Troubleshoot HVAC Problems

Sweltering Heat, How to Troubleshoot HVAC Problems

There is almost nothing worse than sitting in a hot house in the middle of summer without air conditioning. If you suspect that there’s something wrong with your HVAC unit, it’s best to investigate the issue as soon as possible so that you’re not left sitting in the heat. After troubleshooting your issue, you might need to seek the assistance of a professional to get the problem fixed.

Power Supply

The first thing that you should check is the power supply to the unit. Sometimes, the circuit breaker can get tripped or a cord can get disconnected. This is often a simple fix and the least expensive of the issues that could be wrong with the HVAC unit. Try turning the breaker off for a few seconds before turning it back on to see if the unit will respond. You should also look at the fuses for the unit to see if any of them are bad.

Adjusting the Thermostat

To check the thermostat, set the unit to cool. Turn the setting to where it’s about three degrees below the temperature in the room. The unit should come on with cool air blowing from the vents. If no air can be felt, then you may be looking at an issue with the thermostat as it won’t pick up on the temperature in the room to make the unit come on at the right time.

Check the Coils and Wires

This can be a detailed venture, but you need to know if the coils are still working as they should. The cover of the unit will likely need to be removed. After scanning the coils and electrical components, take note to see if any are burnt or damaged. A company such as Edge Guys HVAC can send professionals to the home to replace the parts that are impacting the unit or replace the entire unit if the parts can’t be repaired or replaced.

Proper Ventilation

Check the vents in the home as well as the ventilation system. There shouldn’t be anything blocking the flow of air from the unit to the inside of the home. Check to see if the fan is on or if the unit is set to auto. If the fan is on, then it will run for a longer period of time. Clean the vents and the rest of the system to remove dirt and debris that collects over the winter months.

Troubleshooting your HVAC unit can take a few minutes or a few hours, but the result should mean cold air in the home. While some tasks can be completed yourself, there are repairs that might require the help of a professional. Once the unit is repaired and you have air flowing, it’s important to maintain the unit so that there aren’t any issues in the future.

Guest Post By:

Anica Oaks.

Freelance writer and web enthusiast
Read some of my published work on my Google+ page.

Creepy Crawlers: How to Eliminate Pests in Your Home This Summer

Creepy Crawlers How to Eliminate Pests in Your Home This Summer

The weather is warming up outside, which means that insects and other creepy crawlers will be coming out of hibernation soon. And they are all going to be looking for places to provide them with food, water, and shelter. So houses all over the country will become rapidly infested with them if they aren’t prepared. Luckily, when this happens, there are three ways to eliminate the pests quickly and safely.

Store Food Properly

Proper food storage habits will help keep pests at bay by making the place unappealing to them. All food must be put away in containers that seal shut. And nothing should ever be left out at night that they could snack on. That means, dirty dishes and leftovers all have to be cleaned up before heading to bed.

Keep Things Dry

Most pests can’t endure hot, dry conditions because they need a steady supply of water to drink. So naturally, they tend to congregate around areas that are damp and wet. That is why one of the easiest ways to deter them is to remove as much moisture as possible in the house. This can be done by fixing all of the drips and leaks and removing any sources of water that might be tempting to them. All the sinks in the house should be towel dried in between use. And water dishes for the pets have to be put away at night too.

Remove Trash and Clean

According to Allrid Pest Management, homes with an excess amount of trash and debris make the perfect environment for pests to live in. And the pests will end up spreading to all of the surrounding houses, which perpetuates the problem. That means, even if someone has an immaculate house, they can still end up getting an infestation of pests because they have a dirty neighbor. So the best thing to do in this situation is to report the problematic house to the local authorities to ensure that it gets cleaned up quickly. Then, the neighbors who live in the vicinity need to have their houses treated as well.

Everyone needs to participate in these pest-deterring procedures for them to be effective. That way, the sources of food, water, and shelter are all taken away, which makes the area uninhabitable for the creepy crawlers. But remember, those who already have a severe infestation may need to call in a professional pest control company if these procedures aren’t enough.


DIY Home Energy Audit

You might think that improving your home’s energy efficiency requires a significant investment in new high-tech windows, solar panels for your roof or even overhauling your HVAC system. Although it’s true that making any of those big investments can have a significant impact on your home’s energy consumption, little changes can make just as much of a difference. For example, it’s estimated that the United States spends more than $300 billion a year on energy that is wasted because of drafty doors and windows. A few nickels’ worth of caulk might be all that’s needed to solve the problem for your home. There are countless issues around your home that could be costing you a lot on your energy bill when taken all together, and many of them can be easy to fix.

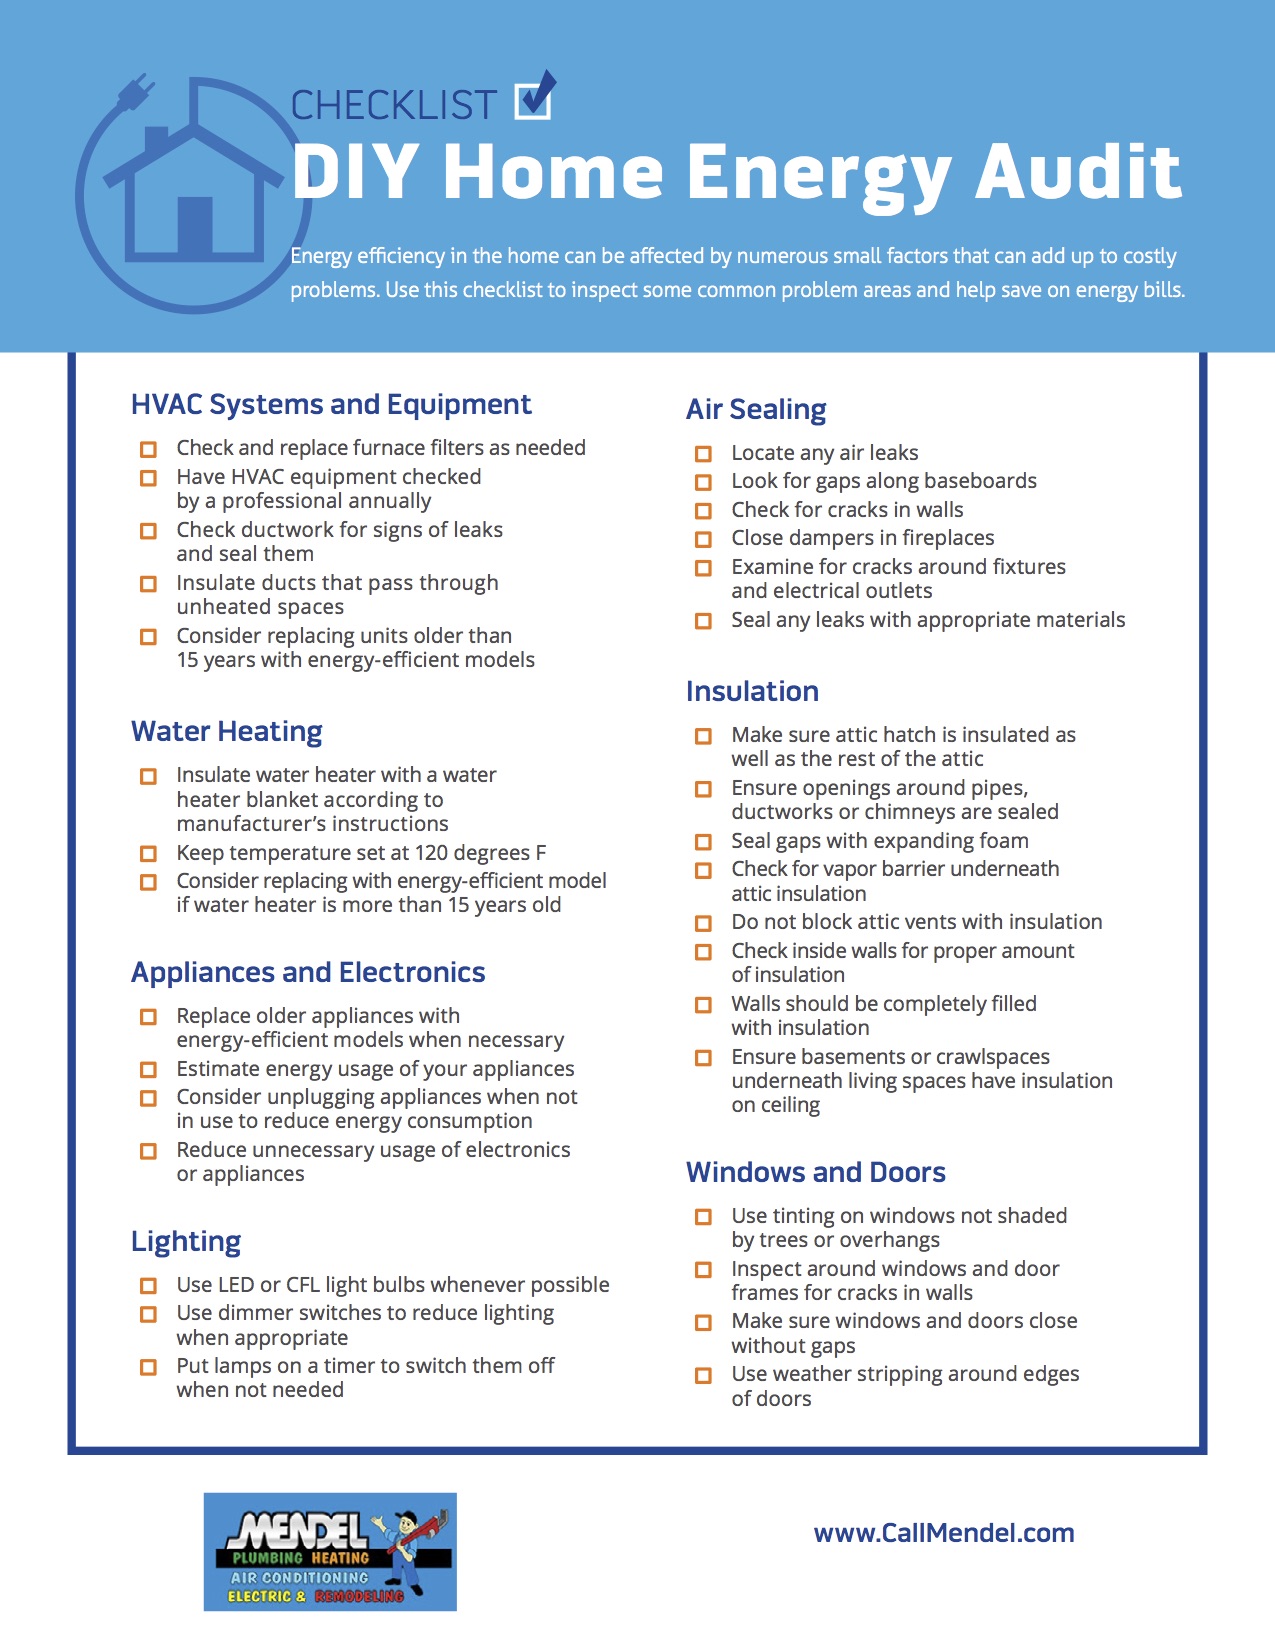
Checking on all of these potential trouble spots on a regular basis can make a huge difference on your energy bills. You can and should hire a professional to perform a home energy audit every so often. However, you also can perform a do-it-yourself energy audit on a regular basis to catch many of the most common and easily fixed issues before they require professional intervention. Yet with so many potential trouble spots in your home that require attention, it can be easy to overlook some of them. The following checklist details some of the most common areas where energy efficiency can be improved around the home. Following it can help you perform a DIY home energy audit and ultimately result in major savings on your energy bill.


DIY Home Energy Audit Checklist

Checklist: DIY Home Energy Audit created by Mendel Plumbing and Heating

Moisture Mishaps: 5 Ways to Prevent Wood Rot in Your Home

Moisture Mishaps: 5 Ways to Prevent Wood Rot in Your Home

Excess moisture in your home may be more of a threat than you realize. It soaks easily into wood, and can be the start of wood rot. Wood rot in your home’s frame can lead to structural weakness and eventual collapse. Moist, rotten wood can also draw termites or form a breeding ground for mold and fungus, which pose health hazards. But wood can last a lifetime if it’s kept dry. Here are some ways to prevent wood rot on your next repair or project.

1. Apply Primer

It’s always a good idea to protect exterior-facing wood against moisture by adding primer. Use oil-based primers made for exterior surfaces, as they tend to penetrate better and last much longer than water or even latex primers. Be sure to paint both sides and edges, including the ends. If you’re trying to cover up existing water damage, apply a couple of coats of alkyd primer instead.

2. Gutter Maintenance

For critical points like eaves and gutter installation, use two coats of primer. Gutters can trap water as debris builds up and pose a greater risk; if the wood that supports them rots away, gutters can pull loose, and you’ll end paying for new gutters on top of replacing the wood. Make sure to keep them clear of things like leaves. Some gutters have guards on them that let water filter through to be redirected while keeping other debris separate and easier to remove.

3. Angled Surfaces

Whether you’re building or repairing eaves, roofing, hand rails, decks, or any external structure, try to slope them slightly away from the central structure so that they tend to shed water. Water can be easily trapped and pooled or redirected by flat surfaces, raised edges, crannies, or rotting leaves. Be sure you consider how to best avoid this.

4. Use Plugs

Every screw or nail you use could be allowing moisture into the interior wood, no matter how tight it seems to be. Whenever you’re doing exterior work, try to use nails or screws with galvanized or stainless seals that form a water-tight seal around the head. Alternatively, you could slightly countersink them and fill the hole with all-weather caulk, sealants, or wood glue before painting or covering. Caulk should also be used on any cracks and holes that have developed around doors, windows, vents, and so forth to avoid seepage of water.

5. Rot-Resistant Woods

Some natural woods are actually very good at shedding water and resisting rot. These include woods like cedar, cypress, and teak that have their own natural oils. However, they can be needlessly expensive for ordinary repairs or interior framework. Generally, you’re safe using cheaper modern alternatives like chemical or pressure-treated wood.

When it comes to preventing rot and water damage, taking the easiest or cheapest way out will likely lead to expensive repairs later. Use these tips and you’ll have rot-resistant wood and sturdy construction for many years to come. Wood rot can cause terrible structural damage later on, so it’s always better to prevent it as much as possible.

Hiring A Window & Door Contractor

There are plenty of repairs and upgrades around the home that you can do yourself with a little practice and the right tools. Installing new windows or doors, however, is something that’s outside most do-it-yourselfers’ comfort zones. Hiring a professional contractor to handle the installation of new windows and doors in your home is essential for ensuring that the job is done properly, and your new windows and doors will fit well enough to prevent drafts and last for a long time. However, hiring the right contractor for the job can be a job in and of itself. Homeowners need to be aware of the signs that the contractors they have chosen are the right ones for their project.

Repairing or replacing doors and windows can be expensive, but not as expensive as it can be to live with the consequences of substandard work from an unqualified contractor. Improperly installed windows and doors can hurt your home’s energy efficiency, lead to costly repairs, and negatively impact the look and resale value of your home. Choosing the right contractor is more than a matter of choosing the lowest bid. Homeowners should consider numerous factors before making the decision to hire a contractor. If you’re considering hiring a professional contractor to install or repair windows or doors in your home, consult the following checklist to make sure you choose wisely and do your due diligence before and after the project. Doing so can ensure that your new windows and doors will last as long as you want them to and that your contractor won’t take advantage of you.

Checklist For Hiring A Window & Door Contractor created by Midwest Window & Door

Water Worries: How to Quickly Fix Leaky Pipes in Your Bathroom or Kitchen

Water Worries: How to Quickly Fix Leaky Pipes in Your Bathroom or Kitchen

If you notice that a faucet is leaking in the kitchen or bathroom, it is imperative that you take care of it as soon as possible. If allowed to linger, it could cause water damage throughout the house in addition to the water making that annoying sound as it falls from the pipe to the floor. What can you do to fix this issues in an affordable and timely manner?

Tighten Them First

It is possible that your pipes just need to be tightened with a wrench. In a matter of seconds, you could have the issue resolved permanently with the tools that you have in your home. If you aren’t sure how to tighten a pipe, you can watch a tutorial or have a friend or family member help you. Remember, you want to go to the right to tighten and to the left to loosen a pipe or any other object.

The Pipe May Need To Be Replaced

There may be a crack or fracture in the pipe that may be allowing water to leak out of it. Some companies, such as Clearwater Plumbing, realize that if that is the case, you need to replace the section where the leak is. Even if the problem is a minor one at the moment, it is important that you take care of it before winter as the cold temperatures could cause small cracks to become complete breaks in the pipe.

You May Be Able to Tape the Leak

The use of sealing tape may help stop a leak for a few hours or days. Ideally, you will then call a plumber to take care of the issue as the tape is no substitute for repairing or replacing a leaking pipe.

Check the Temperature in the Room

In some cases, your pipes may not be leaking at all. They could just be collecting condensation because the room is too hot or humid. To fix the issue, you may just need to find ways to improve air circulation as that will help to get rid of excess moisture in an easy and efficient way.

If the pipes in your bathroom or kitchen are leaking, there is probably a simple fix to resolve the issue. However, don’t hesitate to call a plumber if you aren’t sure what the problem is or if you have tried other remedies that haven’t worked. Regardless of how minor the problem may appear, it could lead to major issues in the future if not addressed quickly.

Plumbing Blunders: What to Do When Your Home Has a Water Leak

Plumbing Blunders What to Do When Your Home Has a Water Leak

Almost every person has dealt with a water leak in their home at some point. A high number of homes and apartments that have suffered from water damage in the past are mostly due to leakage in their plumbing systems. Whenever you discover that you have a water leak at home, you must call a plumber. However, there are a number of things that you can do before the plumbers arrive to prevent any further damage. Here are some important tips on what to do when your home has a water leak.

Shutting Off the Water

As a homeowner it might be best to call a professional such as those from The Clean Plumbers to help with your water pipes. Immediately you discover that a water leak at home, you must act quickly. You should shut off the water going into the appliance or room where you have detected the leak. If there are any electrical appliances connected near the water leak, switch them off and unplug them immediately. You may consider shutting off your circuit breaker depending on the magnitude of the water leak. If the water leak does not subside, you should turn off your chief water valve located in the garage, yard or basement.

Eliminating Water Pressure in Your Pipes

In order to reduce the amount of water leaking in your home, turn on both the hot and cold levers of the lowest spout inside your home either on the first floor or basement. The same should be done on the faucets found in the uppermost floor. This allows air to enter into the pipes and allows them to drain their water via the lever (mostly yellow in color) opened on the house-side water meter. The water will drip for about 10-15 minutes and then slow down if it was leaking from your finished ceiling. If the dripping persists, shut off the water meter using the street-side lever.

Wrapping the Leaking Pipe

As the water pressure in the pipes will have been eliminated, you can use a tape product to wrap around the leaking pipe to act as a temporary fix as you wait for professional services. If the tape is wrapped correctly, it can stop the leakage for a while before the plumbing repairs are done. A rag can be used to wrap the pipes to stop water from being sprayed all over and instead direct it to a bucket or drain.

No homeowner wishes to contend with a water leak in their home. However, in the event that it happens, all the above steps will be useful in controlling a water leak before professional plumbers arrive. They are preventive measures against water damage in your home.


Copyright © 2024 | Bruzzese Home Improvements | All Right Reserved | Web Design & Development by QualityMust